|
|
|
Categories
|
|
Information
|
|
Featured Product
|
|
|
 |
|
|
There are currently no product reviews.
 ;
This is a very good quality print (scan) of the original SONY service manual. The original from Sony is on very thin paper. Nevertheless it is very clear and sharp and excellent readable. I'm very satisfied to have now this rare document. I've looking for it many years (infrequent). It contains very detailed circuit diagrams, exploded views, part lists, PCB view with good readable connection lines. Very recommended.
;
A complete manual with all the needed details of calibrations and service instructions about the radio receiver.
A big deal.
Many thanks !
;
Fast delivery and good quality copy. To be recommended
;
Excellent product, very clear print. Detailed circuit and assembly diagrams - this enabled me to repair my CD player with confidence. I highly recommend this site.
;
Fast access, 100% correct and complete service manual
HV- 29WZ
Item
Measuring instrument
Test point
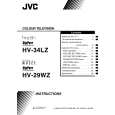
Ad justment part 3.H-CENT
Description 13. Receive a c ircle pattern s ignal. 14. Select 3.H-CENT and set the initial setting value. 15. Adjust H-CENT to make C=D. 16. Press the MENU/OK key and memorize the set value.
Ad justment of Signal H. CENTER gener ator Remote control unit
C
D
Ad justment of H.SIZE
4.H-SIZE
17. Receive a cross-hatch signal. 18. Select 4.H-SIZE and set the initial setting value. 19. Adjust H-SIZE and make sure that the horiz ontal sc reen size of the picture size is in the bellow table. 20. Press the MENU/OK key and memorize the set value. 21. Input a NTSC VIDEO signal (60Hz) from the EXT terminal, and make sure that the horizontal screen size is in the below table. 22. Press the MENU/OK key and memorize the set value.
ASPECT MODE ADJ. ITEM H-SIZE REGULAR 92%
ZOOM ZOOM 16 : 9
(FIXED)
(FIXED)
Ad justment of EW-PIN
6.EW-PIN
Straight
23. Select 6.EW-PIN and set the initial s etting value 24. Adjust EW-PIN and mak e the 2nd.vertic al lines at the left and right edges of the s creen straight. Also make sure that the 3rd vertical lines are straight. 25. Press the MENU/OK key and memorize the set value.
30
No. 52019
|
|
|
> |
|