|
There are currently no product reviews.
 ;
complete wiring diagram, without the part list. high quality copy. thanks for promptly.
;
Well done scan of a useful manual. It will be useful in my workbench!!
 ;
Excelent scan job. It's a fully detailed service manual of this model.
;
Do a quick order, scan quality is high.
I recommend to all!
;
This manual is perfect! Just what I needed. Thanks!
HV-53PRO
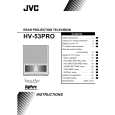
MIRROR
Remove the SPEAKER GRILLE. Remove the CONTROL BOX. Remove the SCREEN ASS�Y. 1. Remove 2 screws attaching the mirror stopper. 2. Raise slightly to disengage of the mirror from the hooks. 3. Remove the MIRROR. NOTE : The MIRROR is front-coated. Do not touch the front of the MIRROR. At least 2 persons are recommended for removing are reassemble. HOOKS
L
MIRROR
H
REAR PANEL
1. 2. 3. 4. Loosen 7 screws . Remove 4 screws . Raise slightly REAR PANEL upward. Pull out the REAR PANEL. MIRROR STOPPER
L
BRACKET
PARTITION
Remove the REAR PANEL. 1. Pull out the PARTITION back ward.
REAR COVER
REAR COVER
Remove the SPEAKER GRILLE. Remove the FRONT BOARD. Remove the CONTROL BOX. Remove the SCREEN ASS�Y. Remove 2 screws attaching the REAR COVER. Remove 2 screws attaching the REAR COVER from front side Slightly pull for backside to disengage of the REAR COVER from hooks. Take out the REAR PANEL. PARTITION
K
1. 2. 3. 4.
I K I J
REAR PANEL
AV TERMINAL BOARD
Remove the REAR PANEL 1. Remove 5 screws . 2. Pull out the power cord clamp from AV TERMINAL BOARD left side. 3. Remove the AV TERMINAL BOARD.
I
AV TERMINAL BOARD
M
12
No.51913
|