|
|
|
Categories
|
|
Information
|
|
Featured Product
|
|
|
 |
|
|
There are currently no product reviews.
 ;
The item received was as described, as expected. I was pleased with the order. Thank you.
 ;
Superb rendition. Drawings (schematics) complete and unabridged. I do a great deal of vintage audio restoration. Documentation is essential for successful repairs. I have found sources over the years that offer good documentation, but rarely all that is necessary. Owner's Manuals has filled that void with complete and legible documentation. They have narrowed my "favorites" to a more manageable collection. This Denon manual in particular contained the latest revisions level, and offered alterations favorable to updating the item. The Illustrated Parts Breakdown (IPB) was well enough detailed to simplify part symbols and physical locations. You will not be disappointed!
;
Clear and concise. Saved me a lot of time and money.
;
Superb manual. Exactly what I ordered and made available in a very timely manner.
;
very fast detailed and accurate hope to do business again
ICF-CD830/CD830L SECTION 1 TEST MODE
3-1. LCD Test Mode
� The LCD test mode is initiated by turning off the main power once then back on or by resetting the machine while IC401 pin-80 terminal (BUZZER LED) is connected to GND, or while depressing the D.S.T. , ALARM MODE and RADIO keys simultaneously. � The LCD test mode operations are listed in the following table. � When the machine enters the LCD test mode, the version number of the system control IC is displayed on the LCD. � Pressing the SNOOZE/DATE/SLEEP OFF key turns on all segments of LCD and LEDs. � Pressing any key turns off the corresponding segment of the LCD. Correspondence between the keys and segments of LCD are as follows.
KEY D.S.T. ALARM MODE ALARM SET CD ALARM SET BUZZER ALARM SET RADIO CLOCK TIME SET � TIME SET + s ALARM CD RADIO BUZZER ALARM-CD LED ALARM-BUZZER LED ALARM-RADIO LED AM, PM,: 1a, 1b, 1c, 1d, 1e, 1f, 1g, 2a, 2b, 2c, 2d, 2e, 2f, 2g 3a, 3b, 3c, 3d, 3e, 3f, 3g, 4a, 4b, 4c, 4d, 4e, 4f, 4g SEGMENT KEY CD PLAY MODE CD RADIO OFF SNOOZE/DATE/ SLEEP OFF , , , TRACK SEGMENT REP, 1, ALL, SHUFFLE, CD, H,
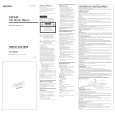
1 2 3 4 5 6
(LCD segment)
a f e g d c b
RADIO, SLEEP 5a, 5b, 5c, 5d, 5e, 5f, 5g, 6a, 6b, 6c, 6d, 6e, 6f, 6g
� After all segments of LCD and LEDs turn off, pressing the SNOOZE/DATE/SLEEP OFF key ends the LCD test mode and resets the machine.
3-2. CD Test Mode
3-2-1. CD TEST-1 (AUTO) � The CD TEST-1 (AUTO) mode is initiated by turning off the main power once then back on or by resetting the machine while IC401 pin79 terminal (RADIO LED) is connected to GND, or while depressing the D.S.T. , ALARM MODE and CD keys simultaneously. � When the machine enters CD TEST-1 (AUTO) mode, it repeats the focus search until the focus becomes OK. � After the focus becomes OK and the focus is automatically adjusted, rough servo is locked in and the adjustment value is displayed.
CD SHUFFLE
F-E BALANCE ADJUSTMENT/FOCUS GAIN ADJUSTMENT TRACKING GAIN ADJUSTMENT/FD OFFSET ADJUSTMENT
AM
TRACK
FOCUS BIAS ADJUSTMENT
� The sled can be moved to the innermost track by pressing the . button. The sled can be moved to the outermost track by pressing the > button. � When the RADIO button is pressed, the machine enters the CLVA (servo ON) and the mute is turned OFF if data is read successfully. When the following button is pressed, the corresponding operations are performed. a) ALARM SET CD Setting the 1 track jump b) ALARM SET RADIO Setting the 10 track jump c) ALARM SET BUZZER Setting the 100 track jump Afterwards the desired track jump can be set by pressing the > or . button. d) ALARM MODE TRACKING GAIN-UP e) RADIO Rough servo � D.S.T. restarts CD TEST-1 (AUTO) mode from the focus automatic adjustment � When the CD button is pressed then, the track jumps to the second session and the machine exits the CD TEST-1 (AUTO) mode. 3-2-2. CD TEST-2 (MANUAL) � The CD TEST-2 (MANUAL) mode is initiated by turning off the main power once then back on or by resetting the machine while IC401 pin-78 terminal (CD LED) is connected to GND. � When the machine enters CD TEST-2 (MANUAL) mode, it repeats the focus search until the focus becomes OK. � After the focus becomes OK, the machine enters the rough servo. � The sled can be moved to the innermost track by pressing the . button. The sled can be moved to the outermost track by pressing the > button. � When the RADIO button is pressed, the machine enters the CLVA (servo ON) and the mute is turned OFF if data is read successfully. When the RADIO button is pressed again, the machine enters the rough servo. � When the CD button is pressed then, the track jumps to the second session and the machine exits the CD TEST-2 (MANUAL) mode.
2
|
|
|
> |
|