|
|
|
Categories
|
|
Information
|
|
Featured Product
|
|
|
 |
|
|
There are currently no product reviews.
 ;
This manual covers the main equipment features only. While it also includes the procedure for saving and loading from the now long obsolete memory cards it does not mention the how to operate with the optional floppy drive interface so I am still at a loss about how to use this! Note that there is a separate manual covering the MIDI interface and programming via the keyboard, not included in this download. You will also need to get hold of this if you want to use the MIDI interface properly. Basically there is little difference between this manual and the free to download manual for the similar PR60 model.
;
Good list of manuals. I found a very rare one and easily get. Should be promptly to download, as we must to wait hours even after confirmed payment.
;
The manual was properly scanned and perfectly readable. The only small problem is that I couldn't use my dear Ctrl + F to find a word I needed.
;
Nothing wrong with the manual or the delivery - came to me the same day I ordered it. But afterwards I realized that I ordered the wrong manual. Probably better with the Quick start - version. So maybe it would be better if we could see a list with inhold for each manual before ordering?
 ;
Bought T4850 High End Tuner a few years ago, but i didn't know where all the buttons were used for. So i purchased the owners manual. Perfect! Just what i needed.
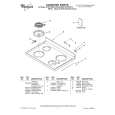
To Clean:
Sealed Surface Burners
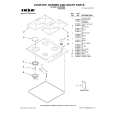
IMPORTANT: Do not obstruct the flow of combustion and ventilation air around the burner grate edges. Before cleaning, make sure all controls are off and the cooktop is cool. Do not use oven cleaners, bleach or rust removers. Burner cap: Always keep the burner cap in place when using a surface burner. A clean burner cap will help avoid poor ignition and uneven flames. Always clean the burner cap after a spillover and routinely remove and clean the caps according to the �General Cleaning� section.
1. Remove the burner cap from the burner base and clean according to �General Cleaning� section. 2. Clean the gas tube opening with a damp cloth. 3. Clean clogged burner ports with a straight pin as shown. Do not enlarge or distort the port. Do not use a wooden toothpick. If the burner needs to be adjusted, contact a trained repair specialist.
A
4. Replace the burner cap, making sure the alignment pins on the cap are properly aligned with the burner base.
D B
A
B
C
E
A. Incorrect B. Correct A. Burner cap B. Alignment pins C. Igniter D. Burner base E. Gas tube opening
5. Turn on the burner. If the burner does not light, check cap alignment. If the burner still does not light, do not service the sealed burner yourself. Contact a trained repair specialist.
Surface Grates
Single Grate (HOB 450)
The X-shaped slot on the grate must be positioned on the raised flange as shown.
Gas tube opening: Gas must flow freely throughout the gas tube opening for the burner to light properly. Keep this area free of soil and do not allow spills, food, cleaning agents or any other material to enter the gas tube opening. keep spillovers out of the gas tube opening by always using a burner cap.
A
A
B
B
A. 1-1¹��" (25-38 mm) B. Burner ports
Burner ports: Check burner flames occasionally for proper size and shape as shown above. A good flame is blue in color, not yellow. Keep this area free of soil and do not allow spills, food, cleaning agents or any other material to enter the burner ports.
C
D
A. Grate B. X-shaped slot C. Burner cap D. Raised flange
7
|
|
|
> |
|