|
|
|
Categories
|
|
Information
|
|
Featured Product
|
|
|
 |
|
|
There are currently no product reviews.
 ;
Very clear scan, I recommend it. Definitely a must have for any 3362 owner.
Alpine could have written a slightly more complete manual, though. It's already pretty huge, but the unit has so many functions, I feel some more explanation would have been better.
Yamaha's manual of their comparable YDSP-1 is a little better in my opinion.
;
Immediate response with excellent service - highly reccommended
;
Correct manual received and of good quality but the contents of the file for the Service Manual for the same monitor is for a 20" TV not the RGB Monitor.
;
The owners manual for the Pioneer VSX-D603S was exactly what I needed. I received it in a timely manor and it was priced fairly. I definately will use your servise again. Thank You
;
This is a great manual. It was easy to read and very accurate. The size of the manual is small so email is no problem. I highly recommend it. The manual is very hard to find other than this website.
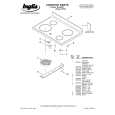
To Remove:
1. Open the oven door. Insert door removal pins, included with your range, into both hinge hangers. Do not remove the pins while the door is removed from the range.
Storage Drawer
The storage drawer can be removed. Before removing, make sure drawer is cool and empty.
To Remove:
1. Pull the storage drawer straight back past the drawer stop notch and the end of the side rails. 2. Slowly close the door until it rests against the door removal pins. 3. Grasp the door on the sides with your fingers on the front of the door and your thumbs on the inside surface. 4. Pull door straight up, then toward you. Hinge hangers will slide out of front frame hinge slot. Do not remove door removal pins until the door is replaced on the range.
A
B
A. Drawer stop notch B. End of side rail
2. Lift up the back of the drawer and pull the drawer out.
To Replace: To Replace:
1. Grasp the door on the sides with your fingers on the front of the door and your thumbs on the inside surface. 2. Hold oven door so that the top edge of each hinge hanger is horizontal. Insert hinge hangers into the front frame hinge slots. 3. Tilt top of door toward range. Slide hinge hangers down onto front frame support pins. Make sure the hinge hangers are fully seated and engaged on the support pins. 1. Lift up the back of the drawer and place it inside the range in its fully forward position. 2. Lift up the front of the drawer to a level position. 3. Slowly push the drawer into the range until the drawer side rails engage with the gap in the drawer glides.
A
4. Insert the door stop clip with the angular surface at the top of the frame hinge slot, then push in the bottom of the clip until flanges are flush with the front frame.
A. Engage drawer glide
4. Once the drawer is fully engaged on both sides, slide the drawer back into the closed position. NOTE: When removing and replacing the storage drawer, a slight push may be needed to move the drawer stop notch past the drawer glides.
5. Open the door completely and remove the door removal pins. Save door removal pins for future use. 6. Close the door.
17
|
|
|
> |
|