|
|
|
Categories
|
|
Information
|
|
Featured Product
|
|
|
 |
|
|
There are currently no product reviews.
 ;
Very satisfied with received document, all is right, Thank You very much, it was a Pleasure to work with You.
 ;
great site, the most easy and fastest way to find the manual you need, no 5 star because the manual was only available in german, but I speak german as well so no problem for me.
;
thanks for this download i got a pioneer bdp-lx70a blu-ray player and it had no manual i search everywhere on the internet and came across owner-manuals.com and i found that it was so easy to find and downloaded from this site if i ever need a manual again this would be the first place that i would come too thanks guys
;
Superb! It's the original manual. We can now use our old calculator with its full function.
;
This is a very well written and comprehensive manual. It answered all our queries.
SAFETY PRECAUTIONS
ENGLISH
� This installation requires technical skills and electrical acknowledgment. It is very dangerous to install this kit by yourself. For installation, consult JVC authorized dealer. � Some of the parts, such as rear panel and blank panel, are very heavy and have keen edges. Be careful when handling them. This Video Input unit allows the Plasma Display Monitor GM-P420PCE and GM-P421PCE to cope with video signals � Video (composite), S-video(Y/C), and Component/RGB � and audio signals.
Preparation
Tools: Work table:
Plus (+) screwdriver Prepare a table with a flat surface 105 cm x 65 cm or wider, and place a suitable cushion or soft cloth on it.
INSTALLATION
1 2
Turn off the power of the Plasma Display Monitor and then disconnet the power cord.
AUDIO MAKE IN RS-232C OUT L R
RGB A
REMOTE
WIRED
AUDIO
OPTION
AC IN
POWER
Remove the blank panel of the Plasma Display Monitor.
1) Place the Plasma Display Monitor upside down (with the screen faced downward) on the work table gently.
Note: Be careful not to get the screen glass scratched or damaged.
Rear side
SPEAKER OUT
SPEAKER OUT
R
( 9 (
L
9
1 2
4
AUDIO MAKE IN RS-232C
OUT L R
RGB A
REMOTE
WIRED
AUDIO
OPTION
SPEAKER OUT
SPEAKER OUT
R
( 9 (
L
9
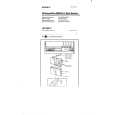
2) Unscrew the 4 screws (1 to 4) indicated in the illustration (Fig. 1) to detach the blank panel of the Plasma Display Monitor.
Note: This removed blank panel is not used when printed board ass�y is installed. Retain all the screws for later use.
Blank panel
3
Fig. 1
Video Input Unit
3
Install the Video Input Unit.
1) There are two connectors on the inner surface of the Video Input Unit. By aligning these two connectors with the connectors inside the monitor, push the Video Input Unit so that the connectors are fully connected. 2) Fix the Video Input Unit with the 4 screws removed in step 2 (1 to 4) (Fig. 3).
Connector
Connector
Rear cover
Connector
Fig. 2
1 2
VIDEO AUDIO L/MONO R IN VIDEO AUDIO L/MONO Y/C IN R Y/G Pb/B VIDEO
4
4
Operate the Plasma Display Monitor.
After the Video Input Unit is installed, operate the monitor and check that image and sound are reproduced correctly through the following inputs: VIDEO A, VIDEO B, and COMPONENT/RGB terminals.
AUDIO L/MONO VD R
IN
OUT
Pr/R
HD/Cs
VIDEO A
VIDEO B
COMPONENT/RGB B
RGB A
AUDIO IN
REMOTE
RS-232C
MAKE WIRED
SPEAKER OUT
R
SPEAKER OUT
L
(
9
(
9
Fig. 3
3
2
|
|
|
> |
|