The owner's manual/operating instructions that I purchased was the original factory document and it was in at least three and maybe more languages. I no longer have it because I sold the tape recorder and included the owner's manual/operating instructions and a service/repair manual that I bought on ebay for the new owner.
Turns out this was not the manual i was looking for. The concertmate 670 keyboard i have is a "Realistic" model made for Radio Shack and none of the diagrams on the owners manual i received matches up. HOWEVER, I must say the service Owners Manual provides was fast and efficient by being available online. The manual was in good readable condition and easily downloaded.
Great price, Quick delivery, the document was very usefull A+++++++++++++++
Text excerpt from page 10 (click to view)
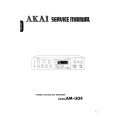
3. To adjust the height proceed as follows: - Loosen or tighten the two front feet. - The rear feet are adjusted by turning the screw in the front kick plate to the left or right.
596
555 x ma
115°
Li89
+
4
4. If necessary, pads are supplied for the rear feet to make sliding the appliance in and out of the recess easier. To fit the pads, press them onto the rear feet. If required, the dimensions of these pads can be reduced by breaking them where marked.
6. Screw appliance into place and retain the cabinet with screws through the securing brackets into the worktop or adjacent woodwork as necessary.
5 5. The joint cover (B) is to be assembled after having installed the appliance in the recess. 7. To mount the furniture door proceed as shown in the figures: