|
|
|
Categories
|
|
Information
|
|
Featured Product
|
|
|
 |
|
|
There are currently no product reviews.
 ;
I was so happy that the owner's manual was available. It is well written and helped me to use the radio/CD player/recorder without problems. Thanks for making it available.
Irene Lambert
;
Excellant!!! Very quick and easy....Best $4.99 I have spent in a very long time..
I highly recommend this.
;
Thanks so much for the Owner's manual for my Sony PS - FL1. I had purchased the turntable off of eBay. It came in and looked great. Packed well and appeared to be great. I balanced and aligned the tone are and hooked it up. When trying to play a record the tone are would move to the right place and just before it would drop to play it moved back off the edge of the record before touching down. I searched the net for an answer to this issue. No luck. Then I purchased the owners manual and sure enough there was a place to adjust where the stylus touched down. That adjustment solved the problem and saved me a $35 feet to have the player checked out. The manual is well written and easy to understand. It is a must have for anyone with this front loading Sony turntable.
;
Some years back I pruchased a Sansui G-9000. I had it cleaned up and a problem with the left channel repaired. When I got it back I hooked it up to my tape decks, turn tables, TV and it played great. The only thing I was not really satisfied with was the performance of my Graphic Equalizer. I purchased this owner's manual had poured myself a cup of coffee. The manual is well organized and written in plain language. It also contained the solution to my dissatisfaction. By using the preamp connections coupled I was able to run everything through my graphic equalizer and now enjoy the full potential of my complete system.
 ;
An excellent service for the price, however, it would also have been handy if the troubleshooter pages were included. The manual is only sent in the language of your country, thus it looks as though there are some pages missing. Otherwise highly recommended.
INSTALLATION (continued)
3. Make sure the wires are firmly seated in the Weco 2-pin connector and that each screw is completely tightened. Insert the wired connector into the POWER socket on the amplifier. Press it in until it stops. 4. Using the Weco 5-pin connector, connect a blue wire from the source unit�s remote connection to the REM terminal. Depending on polarity requirements (e.g., bridged-mono or tri-mode configurations � see Figures 1 through 3 on page 3), connect speaker wires from the speakers to the L and R (+ and �) terminals, as required by your system plan. 5. Make sure the wires are firmly seated in the Weco 5-pin connector and that each screw is completely tightened. Insert the wired Weco 5-pin connector into the 5-pin socket on the amplifier. Press it in until it stops. 6. Connect RCA cables from a source unit to the L and R INPUT jacks.
SETTING INPUT SENSITIVITY...
Initially, turn the front and rear input sensitivity GAIN controls to their minimum (counter-clockwise) positions (refer to Figure 8). 1. Reconnect the (�) negative lead to your vehicle�s battery. Apply power to the audio system and play a favorite music track from CD or tape.
NOTE: After the source unit is on, green LEDs (on the top panel) will illuminate, indicating the amplifier is on. If not, check the wiring, especially the remote connection from the source unit. Also refer to �Troubleshooting� on the next page.
2. On the source unit, increase the volume control to maximum position. Slowly increase the Front and Rear GAIN controls (clockwise) towards three o� clock and, at the same time, listen to the quality of the reproduced sound. At some point, you�ll hear distortion on the music peaks. Stop the adjustment and turn it back slightly.
SETTING THE CROSSOVER...
IMPORTANT: If you plan to use the Kappa 54a to drive full-range speakers, set both AMP and AUX filters to FLAT (refer to Figure 1 on page 3 and Figure 8 below) and skip to the next section, �Setting Input Sensitivity�.
INSTALLING THE CONTROL COVER...
After wiring and testing the Kappa 54a amplifier, install the control cover using the enclosed machine screws to deter tampering and help seal out dust.
NOTE: Do not over-tighten the machine screws. Doing so may crack the cover.
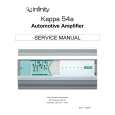
1. Set the front and rear CROSSOVER controls to the frequency recommended by the speaker manufacturer (refer to Figure 8). If the value is unknown, set the control midway.
Figure 8. Kappa 54a front and rear controls for crossover, input, and output.
2. Depending on your system plan, set the AMP and AUX switches to LP (low-pass), HP (high-pass), or FLAT (refer to Figure 8).
Owner�s Manual/Installation Guide � 7
|
|
|
> |
|