|
|
|
Categories
|
|
Information
|
|
Featured Product
|
|
|
 |
|
|
There are currently no product reviews.
 ;
reasonable price for the schematic - the service is perfect, all as expected and pointed by instructions - good scan of the original plans - thank you!
;
Manual was just as described!!! I odered it and in less than a day was able to download it and the text was clear and pages were all complete just as the original manual was. Purcashed this for a friend and they were more than happy. Perfect all around!
 ;
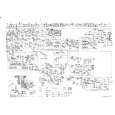
Excellent service and prompt delivery. But it's not a manual - only 4 pages wiring diagrams.
Thanks.
;
The manual I purchased was exactly what I needed to repair my Toshica television. The manual contained schematics and troubleshooting information that was very helpful.
;
Il download del Service Manual JVC HR 4100 non é stato eseguito
General features
English
Theft Deterrent Faceplate
The faceplate of the unit can be detached and taken with you, helping to deter theft.
Projections Release button Grooves
Clock display
Turning clock display On/Off: Press the CLK button to switch the clock display on and off. The £ indicator lights while the clock is displayed.
Adjusting Time
Removing the Faceplate: Press the release button. The faceplate is unlocked, allowing you to detach it.
NOTE
Adjust the time.
1 When the time is not displayed, first press the CLK button to
display the time. 2 Press the CLK button for at least two seconds to enter the clock adjustment mode. The time display will blink. 3 � Adjusting the hours Press the FM button to advance the hours, or press the AM button to make the hours go back. � Adjusting the minutes Press the ¢ button to advance the minutes, or press the 4 button to make the minutes go back. 4 Press the CLK button to end the clock adjustment mode.
� The faceplate is a precision piece of equipment and can be damaged by shocks or jolts. For that reason, keep the faceplate in its special storage case while detached.
� Do not expose the faceplate or its storage case to direct sunlight or excessive heat or humidity. Also avoid places with too much dust or the possibility of water splashing. Reattaching the Faceplate: 1 Align the projections on the unit with the grooves on the faceplate. 2 Push the faceplate in until it clicks. The faceplate is locked in place, allowing you to use the unit.
� 10 �
|
|
|
> |
|