|
|
|
Categories
|
|
Information
|
|
Featured Product
|
|
|
 |
|
|
There are currently no product reviews.
 ;
manual was very helpful in learning how to propery use my washer. I could not find this manual anywhere else.
 ;
Awesome quality manual. You really saved my bacon with this one. Was looking for some specific information with regards to my "new" vintage VCR that didn't come with the owners manual. This site is truely a goldmine of available manuals. The quality of the scans are top notch.
Thank-you so much for this awesome manual. If you're looking for this Sony SL-HF400 owners manual, this is the one you NEED to buy. Definitely worth the money.
;
The manual was made available promptly. I is a clean scan of the original. I had no problem downloading it. The scan was well centered and cleanly formatted. It is as good a product as can be had without being the original document.
;
Received downlink in less then 8 hours, Item was in good copy condition, and told me how to program the clock timer. The price was very resonable, and the process was very automated and was GREAT to work with.
;
Fast service, document is OK. Thanks! Searched for it long time.
Menu settings
English
Mask Key
If you have transmitted the Mask Key's signal once to the unit in advance, you will have to transmit it once again if the unit has been removed from the battery. This function helps prevent theft. transmit the Mask Key�s signal. � If the Mask Key�s signal does not be received correctly, the display will return to "TRANSMIT 1" . In this case, repeat the procedure in step 5.
6 Hold down the transmit button on the Mask key again until the
full transmit level indicator lights up in the display. "APPROVED" will appear in the display, with the Mask key function turning on.
When using the unit for the first time: In order to deactivate the demonstration mode, be sure to press the transmit button to transmit the Mask Key's signal. If this procedure is not carried out, the control panel of the unit will re-open in two seconds even with your vehicle's ignition turned off.
1 Press the SRC button repeatedly to select the standby mode.
"ALL OFF" is displayed when the standby mode is selected. 2 Hold down the MENU button for one second or more. "MENU" is displayed and the menu mode is turned on.
If you press the RESET button or remove the battery: The first time you turn the unit on again, "TRANSMIT 1" will appear in the display, indicating the setting mode has been entered. Repeat steps 5 and 6 above, and transmit the signal. You can start operating the unit again when "APPROVED" appears in the display.
3 Press the FM button repeatedly until the "Mask key" appears in
the display. Press the AM button to search in the other direction. 4 Hold down either the 4 or ¢ button for two seconds or more. "TRANSMIT 1" will appear in the display, indicating the setting mode has been entered. 5 Hold down the transmit button on the Mask key until the full transmit level indicator lights up in the display. "TRANSMIT 2" will be displayed.
Selectable Illumination
You can switch the colour of the button illumination between green and red.
Display and setting:
"Color Green" : The colour of the illumination is green. "Color Red" : The colour of the illumination is red.
Brightness level adjustment
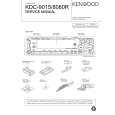
Transmission part Transmit button You can adjust the brightness level of the unit separately when your car's light switch has been turned on or off.
Display and setting: "Bright 0" � "Bright 10"
NOTE
The initial setting value whilst your car's light switch is turned on is "5" , and whilst the light is turned off is "10" .
NOTE
� Keep the Mask Key close to the signal sensor when you
� 34 �
|
|
|
> |
|