|
There are currently no product reviews.
 ;
The document was usefull, and it was exactly what I was looking for.
;
OK?..manual is complet and helpfull... for repairing such a old and rare boombox like JVC PCM it is necessary...
;
Super Anleitung. Ordentliche Auflösung. Das ganze noch in Deutsch wäre zu schön. Alle Datenblätter sind sauber Kopiert und alle Leitungswege sind sauber ausgeführt
;
Thanks God for the internet and thanks for the service like this - proffessional solution on time.
;
About the service it's very fast and reliable. About the manual the quality is high enough to read even the tiniest details on the wiring diagrams so you can't ask much more than that, let it alone for a manual of a product from 20 years ago. Thank you, very satisfied.
KDC-MP425/MP6026 KDC-W6027/W6027Y
DISASSEMBLY FOR REPAIR
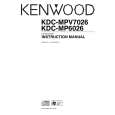
How to Disassemble (PANEL ASSY)
1) Remove four screws (A). 2) While holding the section (B) indicated with arrows, pull and remove PANEL ASSY.
How to install knob (SRC)
1) Place knob (F) and knob (G) in the positions indicated in the diagram below. 2) While keeping these positions, use a piece of adhesive tape (H) to hold knobs in position, as shown in the diagarma.
A x2
3) Set the rotary (J) position as shown in the diagram. 4) While keeping the letters �SRC� horizontally in position, set it to the rotary on the panel. 5) Remove the adhesive tape (H).
A x2
F G
H
B B
B
B
J
3) Pull SWITCH UNIT (C) as indicated in the diagram and remove knob (D). (The knob (D) is attached to the rotary with hook (E) and it is not possible to remove hook (D) only.)
D E
C
3
|