|
|
|
Categories
|
|
Information
|
|
Featured Product
|
|
|
 |
|
|
There are currently no product reviews.
 ;
Manual found fast and good quality, very helpfull service
;
8-17-12 Been using the sight for about 6 months. Fast Downloads and top quality
Manuels !
 ;
Everything was great, the manual, the response time, the simplicity of the order, and the
Price. The only thing that I could possible say on a negative note would be that the manual I ordered was more for a service tech. There were a lot of schematic diagrams that didn't help me solve the problem. However I would order again and recommend the web sight to others.
;
I'd been looking for this manual for awhile. Exactly what I needed - and at an excellant price. Thanks!
;
very complete. acceptable resolution. details are a little unclear. is a manual note 8.
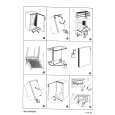
3.1.7 Removing the rear bracket (See Fig.12) � Prior to performing the following procedures, remove the front panel assembly, heat sink, top chassis assembly and main board. (1) From the rear side of the main board, remove the wires from the rear bracket in the direction of the arrow. (2) Remove the screw K, screw L, three screws M and screw N attaching the rear bracket to the main board. Reference: After attaching the rear bracket to the main board, pass the wires through the wire holder and insert them into the slots of the rear bracket.
Wires
Main board Wire holder
Rear bracket
Slots Rear bracket
K
L
MN
Fig.12 3.1.8 Removing the front door mechanism assembly (See Fig.13) � Prior to performing the following procedures, remove the front panel assembly, heat sink, top chassis assembly and main board. (1) From the top side of the bottom chassis assembly, remove the screw P attaching the FPC guide to the bottom chassis. (2) Remove the five screws Q attaching the front door mechanism assembly to the bottom chassis. Reference: When attaching the screws P and Q, apply a locking agent them. (3) Take out the front door mechanism assembly from the bottom chassis.
M
Front door mechanism assembly Bottom chassis
Q
Q
FPC guide
Fig.13
P
(No.MA152)1-11
|
|
|
> |
|