|
|
|
Categories
|
|
Information
|
|
Featured Product
|
|
|
 |
|
|
There are currently no product reviews.
 ;
The manual is useful for trouble shooting for an old instrument. It saved money,and let me enjoy DIY.
 ;
Perfect source of information for replacing the HDD and performing general diagnostics.
;
Perfect source of information for replacing the HDD and performing general diagnostics.
;
Very good scanned copies. Quick response and reasonable price. Thanks for service!
;
Good. Good. Good. Good. Good. Good. Good. Good. Good. Good. Good. Good. Good. Good.
KD-S575
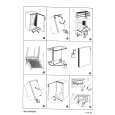
Disassembly method
Removing the front panel unit (See Fig.1)
1. Press the release switch and remove the front panel unit in the direction of the arrow.
Release switch
Fig.1
Removing the front chassis (See Fig.2)
1. Insert a screwdriver to the two joints a on the side of the front chassis and two joints b on the right side, then detach the front chassis toward the front side.
a
b
a
Removing the heat sink (See Fig.3)
1. Remove the three screws A attaching the heat sink on the left side of the body, and remove the heat sink.
Front chassis
b
Fig.2
A
A
A
Fig. 3
Heat sink
c
Removing the bottom cover (See Fig.4)
1. Turn the body upside down. 2. Insert a screwdriver to the two joints c and two joints d on both sides of the body and the joint e on the back of the body, then detach the bottom cover from the body.
Regulator board
d e
Fig. 4
1-5
|
|
|
> |
|