|
|
|
Categories
|
|
Information
|
|
Featured Product
|
|
|
 |
|
|
There are currently no product reviews.
 ;
reasonable price for the schematic - the service is perfect, all as expected and pointed by instructions - good scan of the original plans - thank you!
;
Manual was just as described!!! I odered it and in less than a day was able to download it and the text was clear and pages were all complete just as the original manual was. Purcashed this for a friend and they were more than happy. Perfect all around!
 ;
Excellent service and prompt delivery. But it's not a manual - only 4 pages wiring diagrams.
Thanks.
;
The manual I purchased was exactly what I needed to repair my Toshica television. The manual contained schematics and troubleshooting information that was very helpful.
;
Il download del Service Manual JVC HR 4100 non é stato eseguito
KD-S611
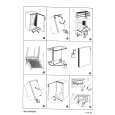
Disassembly method
Removing the front panel unit (See Fig.1)
1. Press the release switch and remove the front panel unit in the direction of the arrow.
Fig.1
Removing the front chassis (See Fig.2)
1. Insert a screwdriver to the joints a on the side of the front chassis and two joints b on the right side, then detach the front chassis toward the front side.
a
b
a
Removing the heat sink (See Fig.3)
1. Remove the three screws A attaching the heat sink on the left side of the body, and remove the heat sink.
Front chassis
b
Fig.2
A
A
A
Fig. 3
Heat sink
c
Removing the bottom cover (See Fig.4)
1. Turn the body upside down. 2. Insert a screwdriver to the two joints c and two joints d on both sides of the body and the joint e on the back of the body, then detach the bottom cover from the body.
Regulator board
e
Fig. 4
d
1-6
|
|
|
> |
|