|
There are currently no product reviews.
 ;
GOOD SERVICE MANUAL.I ALWAYS BUY THERE IF I FIND WHAT I AM LOKING
;
Good quality (clearly readable) manual, I'm glad I could find it here, at a bargain price!
;
Speedy transaction with a quick download. Awesome hassle-free service.
;
very poolite and healpful secure transaction thanks allot
;
- Very good scan quality, PERFECT!
- Sehr gute scan Qualitaet, empfehlenswert!
Wolfgang Sundhaus
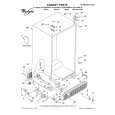
KD-SH909R Removing the trigger arm (See Fig.18 and 19)
Prior to performing the following procedure, remove the top cover, the connector board and the clamper unit. 1. Turn the trigger arm in the direction of the arrow to release the joint k and pull out upward.
Joint k
Trigger arm
CAUTION: When reassembling, insert the part l and m of the trigger arm into the part n and o at the slot of the chassis rivet assembly respectively and join the joint k at a time.
Chassis rivet assembly
Fig.18
Part n Trigger arm Part l Part m Part o
Chassis rivet assembly
Fig.19
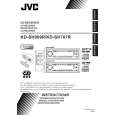
Removing the top plate assembly (See Fig.20)
Prior to performing the following procedure, remove the top cover, the connector board, the chassis unit, and the clamper assembly. 1. Remove the screw H. 2. Move the top plate assembly in the direction of the arrow to release the two joints p.
Top plate assembly
H
Joints p
q
3. Unsolder the wire marked q if necessary.
Fig.20
1-16
|