|
|
|
Categories
|
|
Information
|
|
Featured Product
|
|
|
 |
|
|
There are currently no product reviews.
 ;
Thanks for offering this item at such a good price. Proved handy in identifying the part I was looking for my set.
;
Thr Video Recorder i have is quiet Old and the Producer could Not help me. So i w as very glad to find an offer for the owners Manual for a very fair Price.a I obtained the original Manual very quick and I am happy to have it now.
 ;
The PDF copy was immediately available on download after the payment. However, I noticed that the document was in German, and Ihad to contact a German translator to get it translated it to English. The quality of document is legible can be used for my purpose.
;
The manual was complete and of great quality. Originally a tri-lingual file, I first received only one language. After a note to owners-manuals.com, I quickly received the remaining languages... Great service, definitely worth it.
;
Thank you for providing this manual and at low cost.
The Philips scope is of excellent quality, longevity and build and had a couple of faults
when it was passed to me. Having the CCT diagrams is a blessing.
I have fixed the problems and also modded the scope to my requirements.
I have built a 24v Li-Ion pack for portable use from old but good laptop batts.
it is working beautifully and I am well pleased. Keep up the good work Guys.
U sing and Caring for Your Oven
Using and replacing the oven light(s)
Your oven may have a standard oven light or two side halogen lights. The oven light(s) will come on when you open the oven door. To turn the light(s) on when the oven door is closed, press the Oven Light pad on the control panel. Press the pad again to turn off the light(s).
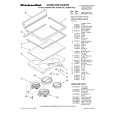
Replacing oven lights (models with side halogen lights):
1. Disconnect appliance at the main power supply. Make sure the oven is cool before replacing the light bulb.
Replacing the oven light (models with light on back wall):
1. Disconnect appliance at main power supply. Make sure the oven is cool before replacing the light bulb. 2. Remove glass light cover by grasping front edge of cover and pulling it away from the side wall of the oven. 3. Remove the light bulb from its socket. Replace the bulb with another halogen bulb (12 volt, 5 watt maximum, available at most hardware stores). 4. Replace the light cover by snapping it back into wall. Reconnect appliance at main power supply. NOTE: The oven lights will not work during the Self-Cleaning cycle.
2. Remove the glass bulb cover in the back of the oven by screwing it out counterclockwise. 3. Remove the light bulb from its socket. Replace the bulb with a 40-watt appliance bulb. 4. Replace the bulb cover by screwing it in clockwise. Reconnect appliance at main power supply. NOTE: The oven light will not work during the Self-Cleaning cycle.
46
|
|
|
> |
|