|
|
|
Categories
|
|
Information
|
|
Featured Product
|
|
|
 |
|
|
There are currently no product reviews.
 ;
The product manual I received was exactly what I was looking for, delivered painlessly at a very fair price. I can't ask for any more than that.
;
Very well done!!!!! congratulations. It was a bit longer than usual the wiating time even if it was on time (in 24 hours).
;
Last week I bought a second hand BAUKNECHT TRK4850 DRYER. It is a professional machine with many programs and switch options. I feared it would be a huge quest to find a manual. I was delighted when I found owner-manuals.com. After payment I received the file to download the next day already. The quality is great. I am very happy. Thanks!
but kindly the distributions of the operating programs not find in the owners manual,can you help me to understand the operating programs instructions thank you
;
Very good copy, very readable and easy transaction as always.
;
It is perfect, exactly what we needed. It's like the paper version but less clutter.
U sing and Caring for Your Cooktop
Replacing
OFF
L O
MED
FRONT
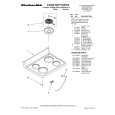
NOTE: Reflector bowls reflect heat back to the cookware on the surface units. They also help catch spills. When they are kept clean, they reflect heat better and look new longer. If a reflector bowl gets discolored, some of your cookware may not be flat enough, or some may be too large for the surface unit. In either case, some of the heat that�s meant to go into or around cookware goes down and heats the reflector bowl. This extra heat can discolor it.
1. Make sure all surface units are off and cool before replacing surface units and reflector bowls.
M E D H I
H I
2. Line up openings in the reflector bowl with the surface unit receptacle.
3. Hold the surface unit as level as possible with the terminal just started into the receptacle. Push the surface unit terminal into the receptacle.
4. When terminal is pushed into the receptacle as far as it will go, push down the edge of the surface unit opposite the receptacle.
MED L O
Cleaning under the lift-up cooktop
1. Lift front of cooktop at both front corners until the support rods lock into place.
2. Wipe with warm, soapy water. Use a soapy steel-wool pad on heavily soiled areas. 3. To lower the cooktop, lift cooktop from both sides while pushing the support rods back to unlock them. Lower the cooktop into place.
12
|
|
|
> |
|