|
|
|
Categories
|
|
Information
|
|
Featured Product
|
|
|
 |
|
|
There are currently no product reviews.
 ;
Excellent manual. Helped me out with disassembling and troubleshooting my projector.
;
thanks you are the best.Very good detail, Quick service response. A useful service manual with all details.
;
Great service!!! Polecam gorąco wszystkim zainteresowanym
;
I liked the price plus it had everything i needed to service the tv.
thankyou Tim Hertz
;
The manual is excellent, well detailed, and divided into two parts. Received very quickly. Thank you.
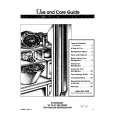
KGP-2A/2B
DISASSEMBLY FOR REPAIR / ADJUSTMENT
Remove the Case from the Chassis
1. Remove 4 screws ( 1 ). 2. Hold the KGP-2A/2B upside down as shown in Figure 2, then lift the chassis upward by pulling the tabs on its side ( 2 ). Also, lift the chassis on the other side in same manner. 3. Grab the chassis from the top and lift it upward ( 3 ), then slide and pull the chassis slightly ( 4 ). Lift the chassis upward ( 5 ) to remove it from the case.
1 1
ADJUSTMENT
Front Panel
DC SOURCE LED GPS LED (KGP-2A only) DATA LED MODE SW
DC SOURCE
DATA
GPS
Start the Programming Menu Mode
Press and hold the MODE SW key for more than 2 seconds. �DC SOURCE� LED blinks and then the KGP-2A/2B enters the programming menu mode.
Fig. 1
2
Note : If the KGP-2A/2B does not receive any programming commands from a PC within 30 seconds after the �DC SOURCE� LED starts blinking. It returns normal operation (User mode). If you press MODE SW key while the �DC SOURCE� LED is blinking, the KGP-2A/2B returns to User mode.
Updating the Firmware
1) Connect the transceiver and KGP-2A/2B as shown in Figure 2 on page 4. 2) Double-click the �Fpro.exe� file (Ver. 3.01 or later) in the folder where the KPG-73D is installed. 3) After the program starts, click the �Open a file� icon [ ], then select the new firmware data file. 4) Configure the KPG-2A/2B to enter the Programming menu mode, then, click [Write] on the Fpro screen to start revising the firmware. (The Fpro program first erases the firmware file on the KGP-2A/2B, then writes the new firmware file.) � While erasing the firmware, the �DC SOURCE� LED blinks green and the �DATA� LED lights orange. � While writing the firmware, the �DC SOURCE� and �DATA� LEDs blink green. When the firmware is successfully revised, only the �DC SOURCE� LED blinks green. � When an error occurrs, the �DC SOURCE� LED blinks green and the �DATA� LED blinks red. In this case, switch the KGP-2A/2B OFF, then turn it ON again. The �DC SOURCE� LED blinks green and the �DATA� LED lights orange. Click [Write] on the Fpro screen to restart revising the firmware. 5) Click �OK� when the confirmation dialog box appears. Select [Exit] to exit the program. 6) Turn the KGP-2A/2B OFF and then back ON to return to User mode. �
Fig. 2
5 3 4
Fig. 3 6
|
|
|
> |
|