|
|
|
Categories
|
|
Information
|
|
Featured Product
|
|
|
 |
|
|
There are currently no product reviews.
 ;
Fantastic quality and impressive delivery time. Based on this manual, I recommend this service without hesitation! Five Stars for certain.
;
Was happy to find the complete owners manual... It's all in there, just like the original...
;
Thanks for offering this item at such a good price. Proved handy in identifying the part I was looking for my set.
;
Thr Video Recorder i have is quiet Old and the Producer could Not help me. So i w as very glad to find an offer for the owners Manual for a very fair Price.a I obtained the original Manual very quick and I am happy to have it now.
 ;
The PDF copy was immediately available on download after the payment. However, I noticed that the document was in German, and Ihad to contact a German translator to get it translated it to English. The quality of document is legible can be used for my purpose.
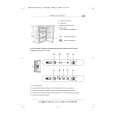
Installing and Connecting the Projection TV
Recommended viewing area (Vertical)
2.4m (ap 65" prox. 8 min ft.) . 2.1m (ap p 57" rox. 7 ft.) min.
REAR SPEAKER OUT R to the terminal on the other one. Note:
� When you use a speaker other than one that we recommend, use a speaker with maximum input power of more than 20 W and impedance of 8 ohms. (Rear of projection TV)
REAR SPEAKER OUT(MIN 8 ) L R L R
Carrying Your Projection TV
Carrying the projection TV requires three or more people. The projection TV has been equipped with casters for easy movement on a hard surface. Please move your projection TV using the casters.
20� 20�
Installing the Projection TV
Recommended viewing area (Horizontal)
mi n. min. 2.1 m 2.4 m (ap 65 prox " . 7 ft. )
Speaker cord (not supplied)
(a 57 ppro " x.
8
ft .)
Mounting the Rear Speakers (not supplied)
For enhanced surround effect, connect the rear speakers to your projection TV. Connecting the rear speakers Using the speaker cords, connect REAR SPEAKER OUT L on your projection TV to the speaker terminal on one rear speaker, and connect
60� 60� 60
Speaker SS-MB115 (not supplied) etc.
Speaker SS-MB115 (not supplied) etc.
6
|
|
|
> |
|