|
There are currently no product reviews.
 ;
Thanks for this "hard to find" service manual. This Sony PS212A is a very good turntable that needed to be restored !
 ;
Excellent quality on these manuals. Same as having the original printed manual and incredibly useful when doing a custom install like me. Keep it up on the good work.
;
This is an excellent information source. Great quality and tons of info regarding technical service for the Technics SH8065.
;
5 stars on this manual since it is the complete version, not the half manual you find free for download all over the web. Good job.
;
Thank you very much you are helping me a lot with my preferred hobby!!! this manual of an old TV is going to be very helpful!!!!
You are very honest competent great job very clear and well done!!!!
Matteo
KRC-594/V/Y/YV
DISASSEMBLY FOR REPAIR
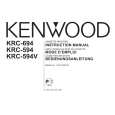
How to remove the Volume Knob
1. Remove the rear cover of panel unit. 2. Juck up as remove the switch unit (x16-) and Volume Knob as shown.
How to install the Volume Knob
1. Remove the peeling paper of LIGHTING BOARD BOSS side. 2. CAP and LIGHTING BOARD are install positioning as shown.
LIGHTING BOARD
Be careful of direction.
CAP
3. Remove the peeling paper.(Use Tweezers) 4. CAP and Volume Knob are install positioning as shown.
(CAUTION)
Volume Knob cannot pull of front side that looked at tab point in the rotary encoder.
Rib: short
Rib: tall
CAP
KNOB(VOL)
Dented part
5. Install a Volume Knob in rotary encoder positioning as shown.
KNOB(VOL)
Mount the Volume Knob into the broad Y shaped cutting in the direction of the picture.
BROAD SIDE
OTHER SIDE
2
|