|
|
|
Categories
|
|
Information
|
|
Featured Product
|
|
|
 |
|
|
There are currently no product reviews.
 ;
Came in the mail within a few hours. Gave clear instruktion on maintaines. Is of great use to have this manual in house
 ;
Easy to access. Clear instructions. No problems. Printed fine.
;
Great scan but please note that it is entirely in GERMAN.
;
High quality scan of the manual, very quick and easy download and very important, a truly honest price. thanks
;
Minden rendben, de két megjegyzés, az ábrák nehezen kivehetők és a fizetés után 24 órát kell várni a letöltésre.
General features
English
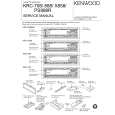
Removing the Faceplate
The faceplate can be detached from the unit, helping to deter theft. Removing the faceplate: � When removing the faceplate, pull it out only when it is fully open. The detachment of the faceplate while it is moving might result in damage to the unit. � Do not apply excessive force to the faceplate bracket without attaching the faceplate. Doing so will cause the faceplate bracket to be deformed. � Do not touch the connector on the faceplate bracket after removing the faceplate. Touching the connector may cause damage to the unit. � Do not touch two metal parts on both sides of the faceplate bracket. Touching those parts may injure you.
NOTE
1 Choose the way from among the following and open the
faceplate. Turn the ignition off, press the SRC button for at least one second, or press the left part at the upper side of the faceplate (as illustrated on p.11) for as many times as you have preset in the "Manual Open Button Setting" (OPEN SW #) in the menu when the control panel has been hidden. 2 Set the faceplate's angle adjustment switch to "0" to set the faceplate angle to the vertical. For details, refer to "Faceplate Angle Adjustment" (page 13).
NOTE
If the faceplate's angle adjustment switch is not set to "0" when mounting the faceplate on the faceplate bracket, it may be difficult to mount the faceplate or the faceplate may not be securely attached and could fall off. Set the angle adjustment switch to "0" before removing the faceplate.
� Sliding the faceplate lock switch cause the unit�s power to turn off. If you want to operate the unit again, remove the faceplate from the faceplate bracket completely and then reattach it. � The faceplate is a precision piece of equipment and can be damaged by shocks or jolts. For that reason, keep the faceplate in its special storage case while detached. � Do not expose the faceplate or its storage case to direct sunlight or excessive heat or humidity. Also avoid places with too much dust or the possibility of water splashing. Reattaching the Faceplate:
1 Hold the faceplate so that the control panel faces the front
toward you and set the left side of the faceplate in the faceplate bracket.
2CAUTION
3 Slide the faceplate lock switch to the left during the period
which you have set in the "Time setting for removing the faceplate" in the menu.
Do not set the right side of the faceplate in the faceplate bracket first, when reattaching the faceplate. Doing so may cause the connector on the faceplate bracket to malfunction. 2 Press the right side of the faceplate until it locks.
Faceplate lock switch
4 Holding the center part of the faceplate, pull it out.
The faceplate bracket will automatically close.
2CAUTION NOTE
If the faceplate bracket's angle was not set to the vertical when
� 12 �
|
|
|
> |
|