|
|
|
Categories
|
|
Information
|
|
Featured Product
|
|
|
 |
|
|
There are currently no product reviews.
 ;
This manual is complete and of high quality. I am very pleased with the purchase.
;
Another excellent buy! A fully readable PDF archive. Good prints!!
;
It is wonderful done!!! a great job in scanning the manual. Superior quality in all the electric scheme. Very understandable and net!!! Thank you!
 ;
muy buen manual por lo completo de este algunos esquemas estan muy divididos lo que hace algo dificil el seguimiento.
;
very good manual, with detail and clarity in esquematic diagrams and waveforms .
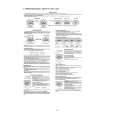
KS-LH4R
Disassembly method
Removing the front panel unit (See Fig.1)
1. Press the release switch and remove the front panel unit in the direction of the arrow.
Front panel unit
Fig.1
Removing the front chassis (See Fig.2 to 4)
1. Remove the two screws A attaching the front chassis. 2. Remove the two screws B on each side of the body. 3. Release the two joints a and the two joints b on the sides. Release the two joints c at the bottom and remove the front chassis toward the front.
A
Fig.2
Front chassis
Joint c
Joint c Joint a
B
Joint b
Joint a
Front chassis
Joint b
Fig. 3
Fig.4
C
C
C
Removing the heat sink (See Fig.5)
1. Remove the four screws C attaching the heat sink on the left side of the body, and remove the heat sink.
Heat sink
Fig. 5
1-3
|
|
|
> |
|