|
|
|
Categories
|
|
Information
|
|
Featured Product
|
|
|
 |
|
|
There are currently no product reviews.
 ;
Good quality instructions manual. Very useful to me. Quick and excellent service from Owner-Manuals... Thanks !!!
;
Sono molto soddisfatto e, quando mi necessiterà, mi avvarrò nuovamente di questo servizio!
;
A comprehensive Operating and Service Manual. All schematics are complete and easy to read. The PCB drawings and complete parts list are very helpful. I would definitely recommend this manual.
;
SCANNING OF HIGH QUALITY
VERY, VERY HIGH VELOCITY DOWNLOAD
VERY GOOD PRICE,
TRUE SATISFIED, THANKS
;
Genuine Toshiba owner's manual. Couldn't really ask for more. And written in understandable English in contrast to a few recent experiences I have had with manuals for other equipment other than Toshiba but made in China and written in "Chinglish"!
CARING FOR YOUR COMPACTOR
Your new compactor is designed to give you many years of dependable service. However, there are a few things you are expected to do in order to maintain your compactor properly. This section will tell you how to clean and care for your compactor.
Cleaning Your Compactor
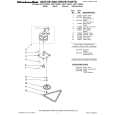
Before cleaning the compactor, turn the Key-Knob (or Key-Switch) to the OFF position and remove. If you will be away for more than a couple of days, remove the compactor bag. Remove the Key-Knob (or Key-Switch) and store it out of children's reach. NOTE: Any services other than those outlined in this section should be performed by a designated service representative. Cleaning exterior surfaces: 1. Wipe with warm, sudsy water and a damp cloth. Rinse. Dry with a soft cloth. 2. Wipe up spills right away. Some foods can damage the finish if left on the compactor surface. Cleaning inside the drawer: 1. Wear protective gloves. There may be bits of glass in the drawer. 2. Remove the bag. (See �Removing a Filled Bag� section.) 3. Press lever-action lock (or Side-Lock latch) down.
Changing the Charcoal Air Filter
1. Insert fingertips in the Air Filter Cover and pull until the side cover tabs release. Lift cover to release the bottom tabs.
2. Remove the Air Filter by pulling the top edge of the filter. The filter should pull out easily. Throw away used filter.
4. Hold lever-action lock and tilt side of drawer until the lock clears the drawer front. NOTE: If desired, drawer side can be removed by tilting it up, then lifting out.
3. To replace, push the replacement filter into place. Insert the bottom tabs of the Air Filter Cover, then snap the side tabs into place. To order replacement charcoal filters (part number 4151750), call the KitchenAid Consumer Assistance Center at 1-800-422-1230. In Canada, call 1-800-807-6777.
5. Wash with a damp cloth using warm, soapy water. Rinse and dry with a soft cloth. 6. If drawer side was removed, slide it back into the tilted position. 7. Press the lever-action lock (or Side-Lock latch) down while pressing the side to the upright position. 8. Latch the drawer side by pushing up the lever-action lock (or Side-Lock latch). Cleaning inside the cabinet: 1. Wear protective gloves. There may be bits of glass in the cabinet. 2. Pull the drawer out until it stops.
13
|
|
|
> |
|