|
There are currently no product reviews.
 ;
Came in the mail within a few hours. Gave clear instruktion on maintaines. Is of great use to have this manual in house
 ;
Easy to access. Clear instructions. No problems. Printed fine.
;
Great scan but please note that it is entirely in GERMAN.
;
High quality scan of the manual, very quick and easy download and very important, a truly honest price. thanks
;
Minden rendben, de két megjegyzés, az ábrák nehezen kivehetők és a fizetés után 24 órát kell várni a letöltésre.
Installation
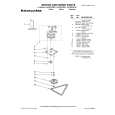
1. Remove the mounting screws attaching the foot pedal to the compactor. Remove foot pedal.
A
A
B
C
A B
C
A. Mounting screws B. Foot pedal
2. Remove mounting screws attaching the toe guard to the compactor. Remove toe guard. 3. Remove the mounting screws attaching the decorative panel to the compactor. Remove decorative panel and discard mounting screws. 4. Align the bottom of the custom panel with the bottom of the drawer front. 5. Secure the panel from the back using four #8 x 1" wood screws as shown. 6. Reinstall the toe guard using the existing screws and ¹��" washer. Then, reinstall the foot pedal.
D E F
A. Handle B. Custom panel C. Panel screw locations D. Toe guard E. Washer F. Toe guard screw
Custom Panel without Handle (for all C and S models) Dimensions
Use these dimension drawings to create a custom panel for use without a trim kit. The panel should be ¹��" (13 mm) min. thick.
25" (63.5 cm)
15" (38.1 cm)
8
|