|
There are currently no product reviews.
 ;
Super nice! Good to have a manual in digital format.
;
Great job supplying the manual.
Many of these products weerepretty obscure, so it was great that you had
the manual for it!
;
Great manual, would not have been able to operate my machine without it!!
James Dawson August 18, 2012
;
excellent value & price! Includes everything you need to know about the NN-C777! I would buy this again.
;
Very satisfied! I was searching for several days, but nope; till I discovered your webside and there it was at a very reasonable price. Keep up the good work!
Paul
Flanders
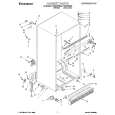
4. Place the other 2 corner posts on the floor to the side of the compactor. Grasp the sides of the compactor cabinet and put compactor on its side on top of the corner posts. Remove the shipping base from the bottom of the compactor.
Cutout Dimensions
A
B
A
3" min. (7.6 cm)
34¹��" min. (87 cm)
A. Leveling legs B. Shipping base
24" min. (61 cm) 18" min. (45.7 cm)
Location Requirements
Product Dimensions
15¹��" min. (38.7 cm)
A. Grounded eletrical outlet must be a minimum of 3" (7.6 cm) away from surrounding cabinets or nearby walls as shown. It can be placed either to the left or the right side of the compactor.
Clearance Dimensions
34¹��" (86.7 cm)
15" (38.1 cm)
24" (61 cm)
B
A
A. Leave 6" (15.2 cm) of clearance space to the right side of the compactor in order to remove the compactor bags. B. Leave 23" (58.4 cm) of clearance in front of the compactor in order to fully open or remove the compactor drawer.
4
|