|
|
|
Categories
|
|
Information
|
|
Featured Product
|
|
|
 |
|
|
There are currently no product reviews.
 ;
Great price for the manual and easy to locate on the site and download. I would buy again.
 ;
Very good copy of Manual, clear and easy to print off, arrived very promptly and reasonably priced. Thanks, I will use you again
;
The service manual when downloaded and printed out was clear and easy to read. The manual is complete with the schematic diagram and technical data. I occasionally require a manual and now having registered with this company I shall order from them in the future.
;
Great manual, great price. I am very pleased with Owner-Manuals.com, quick service, fast communication. Will definitely use this site again.
;
Hello from Germany - thank you very much for the manual for my Sharp "Searcher" - the handling of your internet area is outstanding..Mike
Installation
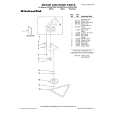
1. Remove the mounting screws attaching the foot pedal to the compactor. Remove foot pedal.
A
A
B
C
A B
C
A. Mounting screws B. Foot pedal
2. Remove mounting screws attaching the toe guard to the compactor. Remove toe guard. 3. Remove the mounting screws attaching the decorative panel to the compactor. Remove decorative panel and discard mounting screws. 4. Align the bottom of the custom panel with the bottom of the drawer front. 5. Secure the panel from the back using four #8 x 1" wood screws as shown. 6. Reinstall the toe guard using the existing screws and ¹��" washer. Then, reinstall the foot pedal.
D E F
A. Handle B. Custom panel C. Panel screw locations D. Toe guard E. Washer F. Toe guard screw
Custom Panel without Handle (for all C and S models) Dimensions
Use these dimension drawings to create a custom panel for use without a trim kit. The panel should be ¹��" (13 mm) min. thick.
25" (63.5 cm)
15" (38.1 cm)
8
|
|
|
> |
|