|
|
|
Categories
|
|
Information
|
|
Featured Product
|
|
|
 |
|
|
There are currently no product reviews.
 ;
Great manual, would not have been able to operate my machine without it!!
James Dawson August 18, 2012
;
excellent value & price! Includes everything you need to know about the NN-C777! I would buy this again.
;
Very satisfied! I was searching for several days, but nope; till I discovered your webside and there it was at a very reasonable price. Keep up the good work!
Paul
Flanders
 ;
Generally speaking good copy; a few pages too hard contrast...
Good service and communication.
;
I purchased the unit from a private party and the original owners manual was not available. Having the ability to download it was extremely helpful and clarified operating the equipment immensely. This is a complicated unit and without the manual I would not have been able to maximize it's potential. Thank you.
Installation
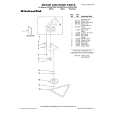
1. Remove the mounting screws attaching the foot pedal to the compactor. Remove foot pedal.
A
A
B
C
A B
C
A. Mounting screws B. Foot pedal
2. Remove mounting screws attaching the toe guard to the compactor. Remove toe guard. 3. Remove the mounting screws attaching the decorative panel to the compactor. Remove decorative panel and discard mounting screws. 4. Align the bottom of the custom panel with the bottom of the drawer front. 5. Secure the panel from the back using four #8 x 1" wood screws as shown. 6. Reinstall the toe guard using the existing screws and ¹��" washer. Then, reinstall the foot pedal.
D E F
A. Handle B. Custom panel C. Panel screw locations D. Toe guard E. Washer F. Toe guard screw
Custom Panel without Handle (for all C and S models) Dimensions
Use these dimension drawings to create a custom panel for use without a trim kit. The panel should be ¹��" (13 mm) min. thick.
25" (63.5 cm)
15" (38.1 cm)
8
|
|
|
> |
|