|
There are currently no product reviews.
 ;
I must admit, I was very skeptical... $4.99 for a 74 page service manual. I've seen some very poorly scanned manuals on the Internet, but this one is VERY good quality! Even when zooming into 500%. Great Deal!
;
Very good detail, Quick service response. A useful service manual with all details. I recomend this service.
;
As Always you can find here manuals even of difficult TV scheme which are scan in almost perfect way.clear and fast!!!!!
Great work thanks!
;
Incredibly clear!!!! Well done, complete and wonderful. It could not better than this!!!!
 ;
Thank You for fast delivery for the sheme.
Everything allright.
Thanks & best regards Franz
KV-20WS1
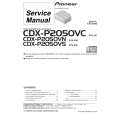
2-3. PICTURE TUBE REMOVAL
7
Two DGC holders
8 Degaussing coil 9 Spring tension 3
C board
2 Chassis
5 Deflection yoke 6 H Board 10 Four PT screws 4 Neck Assembly 1 Anode cap
11 Picture tube
Cushion
�
REMOVAL OF ANODE-CAP
Note: Short circuit the anode of the picture tube and the anode cap to the metal chassis, CRT shield or carbon paint on the CRT, after removing the anode.
* REMOVING PROCEDURES. c
a
b b
Anode button
1
Turn up one side of the rubber cap in the direction indicated by the arrow a
2
Using a thumb pull up the rubber cap 3 firmly in the direction indicated by the arrow b
When one side of the rubber cap is separated from the anode button, the anode-cap can be removed by turning up the rubber cap and pulling it up in the direction of the arrow c
�
1 2
3
HOW TO HANDLE AN ANODE-CAP Don't damage the surface of anode-cap with sharp shaped material ! Don't press the rubber hardly not to hurt inside of anode-caps ! A metal fitting called as shatter-hook terminal is built into the rubber. Don�t turn the foot of rubber over hardly ! The shatter-hook terminal will stick out or damage the rubber.
� 15 �
|