|
|
|
Categories
|
|
Information
|
|
Featured Product
|
|
|
 |
|
|
There are currently no product reviews.
 ;
Excellent service manual, the only known point of note is the alignment of improvability scanned pages within the pdf page. The resolution is good.
;
I was very glad recieving the service manal from You. Additionaly very fast. Extremaly nice servicing. Thanks very mach! Now my GX-220 working better, than it was made. Alexander from Moscow, Russia/
;
Sweet! I won the item on eBay and couldn't adjust the geometry or even keep a steady picure. This guide has the full schematics (not available anywhere else as far as I could tell), and was a bargain for the wealth of knowledge it contains. I hooked it up to my testing equipment, tweaked a few potentiometers and got it playing videogames in no time. Thanks!
;
It was just what I need to fix my old BMW's CD player. Very convenient also. Thank you.
;
Great Manual! It contains all the wiring schematics and mechanical exploded views that are essential for service and repair. I was surprised I even found this for such an old machine. Only wish I knew of this site many years ago.
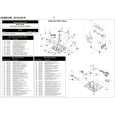
KV-25X3
2-5. A BOARD REMOVAL
Push the claw of the bracket in the direction of the arrow and remove.
2-6. PICTURE TUBE REMOVAL
6 Two DGC Holders 7 Degaussing coil 8 Spring tension 2 Chassis 3 C board 4 Neck Assembly
� 18 �
9 Four tapping screws (M)
�
REMOVAL OF ANODE-CAP
carbon paint on the CRT, after removing the anode.
* REMOVING PROCEDURES. c
a
b b
5 Deflection Yoke
Note: Short circuit the anode of the picture tube and the anode cap to the metal chassis, CRT shield or
1 Anode cap
Anode button
10 Picture tube
1 Turn up one side of the rubber cap in the direction indicated by the arrow a
�
1 2
3
HOW TO HANDLE AN ANODE-CAP Don't damage the surface of anode-cap with sharp shaped material ! Don't press the rubber hardly not to hurt inside of anode-caps ! A metal fitting called a shatter-hook terminal is built into the rubber. Don�t turn the foot of rubber over hardly ! The shatter-hook terminal will stick out or damage the rubber.
2 Using a thumb pull up the rubber cap 3 When one side of the rubber cap is firmly in the direction indicated by the separated from the anode button, the arrow b anode-cap can be removed by turning up the rubber cap and pulling it up in the direction of the arrow c
Cushion
|
|
|
> |
|