|
|
|
Categories
|
|
Information
|
|
Featured Product
|
|
|
 |
|
|
There are currently no product reviews.
 ;
It's a full manual. All the parts are in there. I haven't found the problem yett, but I am working on it; hope I can rebuild the part myself. To make it more secure and unbreakable this time. Because the part has failed several times before and costs a lot to let it be repaired.
Thanks so much for this rich illustrated and parted manual.
;
I downloaded the document. The manual was complete, well scanned and everything was legible. I could zoom in see what I needed to know. There's not much more that you can ask.
;
It was complete service manual with all needed service informations. Thanks.
 ;
El manual esta muy detallado, los numeros de partes y los esquemas de despiece son correctísimos y muy claros, tanto para los técnicos experimentados como para los novatos.
;
Ottima qualità grafica e completo nelle notizie. Costo abbastanza contenuto.
KV-32FS10/32FV15/32XBR250/34FV10/34FV15/34FV15C/34FX250C/34FV15K 34FV15T/36FS10/36FV15/36XBR250/38FX250/38FX250C/38FX250T/38FV15K
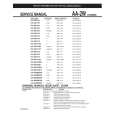
2-5. PICTURE TUBE REMOVAL
WARNING -- Before removing anode-cap:
High voltage remains in the CRT even after the power is disconnected. To avoid electrical shock, discharge CRT before attempting to remove the anodecap. Short between anode and coated earth ground strap of CRT. Deflection yoke Four screws
(Tapping screw 7)
UX/UY board G/GA board C board Neck assy AK board Chassis
A board
Anode-cap
Picture tube
Coated earth ground strap
Cushion
ANODE-CAP REMOVAL
WARNING: High voltage remains in the CRT even after the power is disconnected. To avoid electrical shock, discharge CRT before attempting to remove the anode-cap. Short between anode and coated earth ground strap of CRT. NOTE: After removing the anode, short circuit the anode of the picture tube and the anode cap to either the metal chassis, CRT shield, or carbon painted on the CRT.
REMOVAL PROCEDURES
Turn up one side of the rubber cap in the direction indicated by arrow .
Use your thumb to pull the rubber cap firmly in the direction indicated by arrow .
HOW TO HANDLE AN ANODE-CAP
Do not use sharp objects which may cause damage to the surface of the anode-cap. Do not squeeze the rubber covering too hard to avoid damaging the anode-cap. A material fitting called a shatter-hook terminal is built into the rubber. Do not force turn the foot of the rubber cover. This may cause the shatter-hook terminal to protrude and damage the rubber.
When one side of the rubber cap separates from the anode button, the anodecap can be removed by turning the rubber cap and pulling it in the direction of arrow .
� 16 �
|
|
|
> |
|