|
There are currently no product reviews.
 ;
Fast delivery, excellent resolution and complete. And above all, the best price ever !
;
Vielen Dank,
das war eine prima Sache. Habe das Serviceheft nach 3 Stunden herunterladen können. Qualität OK. Hat mir mit Erfolg bei der Fehlersuche und Reparatur meines
Nordmende Galaxy Mesa 9000 geholfen. Ich kann diesen Service bestens weiterempfehlen
A very good service.
Thank You!
;
everything i needed. it was easy to get. and this site is now my go to site for manuals.
 ;
Quality as promised it arrived fast. No problems what so ever
;
Good scan, very handy and it also includes the user manual. 122 pages in total.
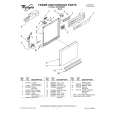
3.5.3 Removing the hideaway board (See Figs.5 and 6) � Prior to performing the following procedures, remove the top chassis and DSP board. (1) From the rear side of the main body, remove the four screws E attaching the hideaway board. (See Fig.5.) (2) From the top side of the main body, disconnect the wire from the connector CN601 on the hideaway board. (See Fig.6.) Reference: After connecting the wire to the connector CN601, fix it with the wire holder as before. (See Fig.6.) (3) Remove the three screws F attaching the hideaway board. (See Fig.6.) (4) Take out the hideaway board from the bottom chassis assembly.
E
Fig.5
CN601 Wire holder Hideaway board
F
Fig.6
1-34 (No.MA101)
|