|
There are currently no product reviews.
 ;
Very satisfied with received document, all is right, Thank You very much, it was a Pleasure to work with You.
 ;
great site, the most easy and fastest way to find the manual you need, no 5 star because the manual was only available in german, but I speak german as well so no problem for me.
;
thanks for this download i got a pioneer bdp-lx70a blu-ray player and it had no manual i search everywhere on the internet and came across owner-manuals.com and i found that it was so easy to find and downloaded from this site if i ever need a manual again this would be the first place that i would come too thanks guys
;
Superb! It's the original manual. We can now use our old calculator with its full function.
;
This is a very well written and comprehensive manual. It answered all our queries.
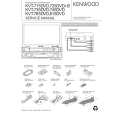
Installation pour unité moniteur/lecteur
Tôle pare-feu ou support métallique
Vis (M4X8) (disponibles dans le commerce)
Tordre les pattes du manchon de montage avec un tournevis ou un outil similaire et fixer. Vis à tôle (disponibles dans le commerce) Armature de montage métallique (disponible dans le commerce) Accessoire 5
Assurez-vous que l�appareil est solidement installé à sa place. Si l�appareil est instable, il pourrait ne pas bien fonctionner (par ex., le son pourrait sauter).
Installation du récepteur
1. Fixer les attaches d'installation 9 sur les côtés de l'unité de dissimulation à l'aide de vis à tête sems 7.
Attaches d'installation (Accessoire 9) Vis à tête sems (M4 � 8 mm) (Accessoire 7)
2. Utiliser la vis taraudeuse 8 pour fixer l'unité de dissimulation sur le panneau audio.
Vis taraudeuse (ø4 � 16 mm) (Accessoire 8)
French 17
|