|
|
|
Categories
|
|
Information
|
|
Featured Product
|
|
|
 |
|
|
There are currently no product reviews.
 ;
I found this rare manual, in french ! The brand of my washing machine is not famous but this site had the manual, that is perfect.
;
The manual was everything that I wanted. Clearly printed and delivered in very quick time. Would certainly use again if I needed a manual in the future
;
I received the manual in correct time. It was a perfect help for me.
;
excellent quality, contains circuits and scan quality, 226 pages
 ;
Great price for the manual and easy to locate on the site and download. I would buy again.
6. Copy
6 Copy
6.1 Using the unit as a copy machine
6.1.1 Entering the copy mode
Before copying, set the operation mode to the copy mode.
6.2 Making a copy
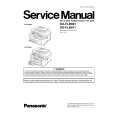
6.2.1 Using the auto document feeder
L Confirm that there are no documents on the scanner glass.
{CONTRAST} {RESOLUTION} 1 {COPY}
Press {COPY} to turn the {COPY} light ON. Note: L You can change the default operation mode (feature #463 on page 60) and the timer before returning to the default operation mode (feature #464 on page 60). L Copied documents will be stacked on the upper output tray. You can change the output tray for copying (feature #466 on page 65) (KX-FLB811 only). L If the {FAX AUTO ANSWER} indicator is ON, the unit can receive faxes automatically even in the copy mode.
{COPY} {V}{^}
{STOP} {START}
1 2
If the {COPY} light is OFF, turn it ON by pressing {COPY}. Set the original. 1. Adjust the width of the document guides (1) to fit the actual size of the document. 2. Insert the document (up to 40 pages) FACE UP into the feeder until a single beep is heard.
3
If necessary, change the following settings according to the type of document. L To select the resolution, see page 45. L To select the contrast, see page 45. If necessary, enter the number of copies (up to 99). Press {START}. L The unit will start copying. After you finish copying, press {STOP} to reset the settings you set in step 3 and 4.
4 5 6
Note: L Any document which can be sent as a fax can also be copied and scanned (page 30). The effective scanning area is changed depending on the setting of the paper size. L Do not open the document cover when making a copy with the auto document feeder.
44
|
|
|
> |
|