|
|
|
Categories
|
|
Information
|
|
Featured Product
|
|
|
 |
|
|
There are currently no product reviews.
 ;
I purchased the unit from a private party and the original owners manual was not available. Having the ability to download it was extremely helpful and clarified operating the equipment immensely. This is a complicated unit and without the manual I would not have been able to maximize it's potential. Thank you.
;
Being a user of older radios of many kinds, preferring them over more modern rigs, this manual was invaluable in the programming of my two. I now know for certain what the assorted buttons functions are, and am very grateful to have found this excellent site. Many thanks for your assistance, Tony.
 ;
Clear and easy to read. All details as expected. Price acceptable , and quick delivery.
;
Quick response and exactly what I was looking for and at a great fair price!
;
5 star quality on these downloadable manuals. Easy to read and all the information is there. A must when doing a custom install or needing to service your precious old school electronics.
6. Maintenance
Lamp
When operation time reaches the last 1400 hours of the average lamplife, the message �Lamp life has almost exceeded� will be displayed on the screen, When operation time reaches 1500 hours, the message �Lamp life has exceeded� will be displayed. The lamplife remaining can be checked using the OSD menu. 1 Press Menu. 2 Use Cursor Control to move the cursor to �Setup�. 3 Use Cursor Control to select �Lamp counter�.
>
Lamp Replacement
Menu OK
1
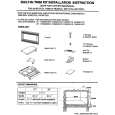
Switch off the projector and wait until the lamp has cooled down before disconnecting the projector. Remove the mains lead from both projector and wall socket.
Source
Auto Image
Lamp
Temp.
2
A
Press tab A and remove the lamp door.
3 4 � �
B B
Unscrew the screws B. Grasp the lamp holder handle and carefully pull the lamp holder out of the projector. Do not tilt. If the inner tube is broken glass particles may fall out. Keep lamp holder opening to your right. Do not touch lamp or point lamp holder opening at anyone. Carefully remove the new lamp housing from its package. Always use the same type of lamp: See �Optional accessories� for the correct type of lamp for your projector. Do not touch lamp or point lamp housing opening at anyone. Do not drop, as the impact may cause the lamp to break. Place the lamp holder in the guiding slots and insert into the lamp compartment. Tighten screws B again.
5 � � � 6 7
B B
A
8 9 10 11 12
Put the lamp door back in place and press tab A back in its original position. Insert the mains lead into both the projector Mains inlet socket and the wall socket. Press the Standby button to switch on the projector. Reset the lamp life time (see �Resetting the lamplife time�). Dispose of the old lamp in special chemical disposal bins.
Philips Multimedia Projector
25
English User guide bCool XG1
|
|
|
> |
|