|
|
|
Categories
|
|
Information
|
|
Featured Product
|
|
|
 |
|
|
There are currently no product reviews.
 ;
manual de usuario perfecto y completo de buena calidad de impresion y muy detallado ideal !
 ;
It`s full copy of a service manual from url http://www.philips.owner-manuals.com/PM3216-service-manual-PHILIPS.html
;
perfect! you just sent to me the copy in Italian witout even my specification!!!! so you are really smart cooperative and efficient. To my opinion the best place all over to get a manual of electronics!!!!
;
Well Well Well!!!! Good manual perfect for my hobby!!! As Before you have done a very well done work!!!! Thank you
;
Super nice! Good to have a manual in digital format.
3. Remove the light bulb counterclockwrse
bv turning
it
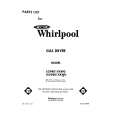
2. Lay wet items on top of the rack
Now space between them for air to mode around 3. The rack does not move, but the drum turns Be sure nothing hangs over the edges of the rack Do not hang items from the rack 4. To remove the rack, push It back. lrft up and pull out. NOTE Use the TIMED DRY Control seTtrngs Drying times WIII depend on how much moisture the items hold Suggested dryrng temperatures ore given II the following chart
4. Rep/ace ihe nil/t: on/y wi:h 0 40 watt app//once bdb (from most hardware, grocery or vorletv stores] 5. Replace the light-bulb cover and lock in place by turning counterclockwise
Items for Rack Drying
I. Wool Sweaters [Block to shape and lay flat on rack ] 2. Stuffed Toys [Cotton or polyester fiber filled ) 3. Stuffed Toys (Foam rubber fIlled 4. Sneakers 5. Foam Rubber Pillows
Drying Temp. Setting
KNITS GENTLE - LOW REG HEAVY ~ HIGH FLUFF AIR FLUFF AIR FLUFF AIR
Using the Drying Rack
The drying rack lets you dry Items that you may not �vant to tumble, like sneakers, stuffed tovs, etc
1. Fit the rear legs of the rack Into the grooves on the back wall of the drY/er Push them In and jet the front legs of the rack down on the front of the dryer as shown
|
|
|
> |
|