|
|
|
Categories
|
|
Information
|
|
Featured Product
|
|
|
 |
|
|
There are currently no product reviews.
 ;
Very satisfied with received document, all is right, Thank You very much, it was a Pleasure to work with You.
 ;
great site, the most easy and fastest way to find the manual you need, no 5 star because the manual was only available in german, but I speak german as well so no problem for me.
;
thanks for this download i got a pioneer bdp-lx70a blu-ray player and it had no manual i search everywhere on the internet and came across owner-manuals.com and i found that it was so easy to find and downloaded from this site if i ever need a manual again this would be the first place that i would come too thanks guys
;
Superb! It's the original manual. We can now use our old calculator with its full function.
;
This is a very well written and comprehensive manual. It answered all our queries.
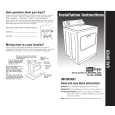
CHECKING YOUR VENT
Your dryer must be properly installed and vented to achieve maximum drying efficiency and shorten drying times. Use the minimum recommended installation clearances (found in your Installation Instructions) to avoid blocking the flow of combustion and ventilation air. Refer to your Installation Instructions for more information.
3. The exhaust vent can be routed up, down, left, right, or straight out the back of the dryer. Space requirements are listed in your Installation Instructions.
4. Use the straightest path possible when routing the exhaust vent. Use the fewest number of elbows and turns. Allow room when using elbows or making turns. Bend vent gradually to avoid kinking.
Fire Hazard Use a heavy metal vent. Do not use a plastic vent. Do not use a metal foil vent. Failure to follow these instructions can result in death or fire.
If the dryer is not properly installed and vented, it will not be covered under the warranty. NOTE: Service calls caused by improper venting will be paid for by the customer, whether it was a paid installation or selfinstalled. 1. Do not use plastic vent or metal foil vent. Use 4 in. (10.2 cm) metal or flexible metal vent. Do not kink or crush flexible metal vent. It must be completely extended to allow adequate exhaust air to flow. Check vent after installation. Refer to your Installation Instructions for proper length requirements of vent.
5. Use duct tape to seal all joints. Do not use screws to secure vent. Lint may catch on screws.
6. Clean exhaust vent periodically, depending on use, but at least every 2 years, or when installing your dryer in a new location. s Disconnect vent from the dryer and clean one section at a time until you reach the exhaust hood.
s
To clean out lint, use the hose attachment on your vacuum, or a pole or wire with a feather duster or rag attached. Be sure the flapper on the outside end of vent moves freely. When cleaning is complete, be sure to follow the Installation Instructions supplied with your dryer for final product check.
s
2. Use a 4 in. (10.2 cm) exhaust hood. Smaller hoods increase drying times.
2
s
1
4" (10.2 cm) 4" (10.2 cm)
6
|
|
|
> |
|