|
|
|
Categories
|
|
Information
|
|
Featured Product
|
|
|
 |
|
|
There are currently no product reviews.
 ;
Thank you very much for this Service Manual, it helped us a lot to repair the M-4318!
...BUT: The parts list is missing and the free parts katalog on web isn't complete, so now we don't know the part numbers of the defect parts :(
We had to build them out of a working machine, and need the numbers to reorder the missing parts now.
 ;
Very good manual with clear electrical diagrams. Thanks owner-manuals.
;
Great manual, thank you, sony kp46s3 service manual perfectly, i am very happy.
;
Complete original Service Manual in good (scan) quality!
;
Very good manual. Plenty of service information including alignment instructions. Clear circuit diagram. Excellent, thank you.
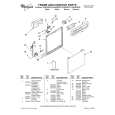
PRECAUTIONS
To prevent damage of the thermal head caused by static electricity when assembling the chassis ass'y into the unit, the following steps must be followed; 1 : Turn the power switch off. 2 : Discharge the capacitor C18(2200µF) on the PCB L271-1. CN301 3 : Connect the FPC of chassis ass'y into a connector CN301 of PCB L271-2. 4 : Assemble the chassis ass'y. 5 : Turn the power switch on.
PCB L271-2
FPC
C18
LSI1
Chassis ass'y
ADJUSTMENT
Adjustment of low battery detection circuit
PCB L271-1
Figure-4
To adjust the threshold voltage of the low battery detection circuit, the following steps must be followed; 1 : Apply 6.2V + 0.1V / -0V to the battery terminals. 2 : Ground check pads CP45 and CP46. 3 : Adjust a pot VR1 so that the voltage between CP1 and CP2 is 0V ± 10 mV.
Multi-meter PCB-L271-1
+
CP2 CP1
VR1 CP46
BATT
-
CP45
+
6.2V (+0.1 / -0 V) Power supply
BATT +
GND
Figure-5 Setting the thermal head rank Set the thermal head rank with pads RNK1 and RNK2 on the PCB L271-1 according to the following conditions when replacing the chassis ass'y or thermal head. The head rank is indicated on FPC as following figure-6. Head rank A : RNK1=ON, Head rank B : RNK1=OFF, Head rank C : RNK1=ON, Head rank D : RNK1=OFF, RNK2=OFF RNK2=OFF RNK2=ON RNK2=ON
XXXXXXB
Head rank = B
XXXXXXB
Figure-6
�4�
Chassis ass'y
|
|
|
> |
|