|
|
|
Categories
|
|
Information
|
|
Featured Product
|
|
|
 |
|
|
There are currently no product reviews.
 ;
First class Service,
best quality, come again
Thank You.
vac
;
I didn't realise a manual for an early plasma TV such as the one we were gifted could be so easily obtained. No manual was supplied with it, and as senior citizens we were a little puzzled over some aspects of its use. I do not want a listing for your store credit as we are not fairly big computer users. The manual was well organised, as it should be, with its backing of the Pioneer name. The download was prompt and everything worked quite smoothly. Thank you. Gordon.
;
Thank you very much for the manual. It is what I needed and it will be very helpful to me. The delivery of the manual was easy and very fast. I strongly recommend this site to other users. Best regards.
 ;
Excellent!! Got what I need and very fast!! Thank You
;
Manual acquired with good resolution, complete in all its pages, very good policy of the folder where are saved all products purchased.
2. Press EXE to reset the memory and delete all data or any other key to abort the reset operation without deleting anything. Following the reset operation described above, the Home Time display appears and the unit settings are initialized as noted below. Home Time: 12-hour format JAN/1/1995 AM/12:00 00 Tokyo (TYO) London (LON) 12:00 AM Reminder alarm � OFF Daily alarm � OFF Key input tone � OFF Hourly time signal � OFF
Zone: World Time: Daily Alarm: Sound:
TO SAVE THE DATA
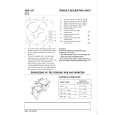
The unit can transfer the data stored to another unit. CAUTION: Before connecting wires, be sure to put the units in transmission and receiving mode. Furthermore, after completing saving data, remove wires while showing OK or NG on display. If no, data stored in customer's unit are corrupted. To save the data, the following steps must be followed; 1. Remove the battery cover of both units. 2. Press RESET button of both units. 3. Short the pad TR of customer's unit. (Display shows "T".) 4. Short the pad TR twice of slave unit. (Display shows "R".) 5. Connect 4 terminals on PCB with wires as shown in the figure below. Customers RESET button RESET button Slave
Enlarge
Enlarge
CP12 TR CP10 CP10 CP11 CP13 CP2
�3�
CP2
CP10 CP11 CP12 CP2
CP11 CP13
|
|
|
> |
|