This place is amazing. Got our manual in a few hours. Print quality is excellent. Even the manufacturer didn't have this manual. The price was excellent. How many more stars can I give them? More than satisfied.
This was a very hard to find manual. The unit is long discontinued and Pioneer doesn't retain every manual for every model. Thanks owner's-manual.com!
Text excerpt from page 5 (click to view)
d
� Halten Sie keine harten Gegenstände (z.B. Löffel) in das laufende Messer und greifen Sie nicht mit der Hand in den Mixbehälter. Es besteht Verletzungsgefahr! � Der Hersteller haftet nicht für eventuelle Schäden, die durch nicht bestimmungsgemä�en Gebrauch oder falsche Bedienung verursacht werden.
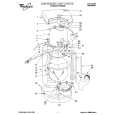
Aufbau des Standmixers
0 Setzen Sie den Dichtungsring auf die Messervorrichtung (Bild 5). 0 Setzen Sie die Messervorrichtung von unten in den Mixbehälter. Drehen Sie sie gegen den Uhrzeigersinn, um sie zu befestigen (Bild 6). Achtung: Verletzungsgefahr! 0 Setzen Sie den Behälter auf das Motorgehäuse und drehen Sie ihn entgegen den Uhrzeigersinn bis zum Anschlag. Beide Pfeile müssen übereinander stehen (Bild 7). 0 Setzen Sie den Deckel auf den Behälter und drehen Sie ihn, bis die Nase des Deckels direkt über dem Griff steht (Bild 8). Dank dem 2-Weg-Sicherheitssystem lä�t sich der Standmixer nur bedienen, wenn der Behälter und der Deckel richtig sitzen (Bilder 7 und 8). Siehe auch den Abschnitt �Zweifach-Sicherheitssystem�. 0 Setzen Sie den Füllbecher (Bild 1/C) ein und verriegeln Sie ihn.
;
Dieses Gerät entspricht den folgenden EG-Richtlinien:
� 73/23/EWG vom 19.02.1973 �Niederspannungsrichtlinie", einschlie�lich �nderungsrichtlinie 93/68/EWG � 89/336/EWG vom 03.05.1989 �EMVRichtlinie", einschlie�lich �nderungsrichtlinie 92/31/EWG
Technische Daten
Netzspannung: 230/240 V Leistungsaufnahme: 500 W
3
Anwendungsbeispiele
Der Standmixer dient zur Zubereitung verschiedenster Mixgetränke, zum Zersto�en von Eis, Zerkleinern von Früchten und Gemüse, Sahne schlagen usw.
Bedienen des Standmixers
Stellen Sie den Standmixer auf eine ebene und trockene Arbeitsfläche. 0 �ffnen Sie den Deckel (Bild 1/D) und geben Sie alle benötigten Zutaten in den Behälter. Achtung: Maximale Füllmenge von 1,5 Liter nicht überschreiten!
Kabelfach (Bild 2)
Das Gerät besitzt ein Kabelfach. Falls die Zuleitung zur Steckdose zu lang ist, können Sie nicht benötigtes Kabel im Gehäuseboden unterbringen.
3
Gerät auseinandernehmen
0 Netzstecker ziehen. 0 Behälter im Uhrzeigersinn drehen und abnehmen (Bild 3). 0 Messervorrichtung im den Uhrzeigersinn drehen und abnehmen (Bild 4).
3
Während des Betriebes können Sie weitere Zutaten durch die Einfüllöffnung hinzugeben. Sie können hierfür auch den Füllbecher im Deckel (Bild 1/C) verwenden. Schlie�en Sie die Einfüllöffnung jeweils wieder sofort, um
1
Achtung: Die Messervorrichtung ist sehr scharf. Es besteht Verletzungsgefahr! Achung: Die Messervorrichtung nicht mit Gewalt aus dem Mixbehälter entnehmen, da diese sonst beschädigt werden könnte! Messervorrichtung beim Entnehmen ggf. leicht schräg halten.
Spritzer zu vermeiden. 0 Starten Sie den Standmixer, indem Sie den Drehwähler (Bild 1/J) nach rechts drehen oder die Pulse-Taste (Bild 1/H) drücken.