|
|
|
Categories
|
|
Information
|
|
Featured Product
|
|
|
 |
|
|
There are currently no product reviews.
 ;
I wished detailed information of the JBL S310 and here I found it! Very happy with the service from this site!
;
The manual was very helpfull, it answerdes all my questions, and i was surprized to find the original manual on this site! Big thumbs uP:)
 ;
helpful manual.good service.Quick response.will use again
;
Speedy confirmation to my order , with elaborate instructions .
Item Email , received immediately as desired by me.
A Pleasant & Satisfying Transaction.
;
I was searching for this manual at last i got it from this web
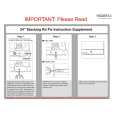
S T AC K ING K IT INS T AL L AT ION
6. 1.
1)P osition the unit on a level surface, capable of supporting the entire weight of the dryer. R emember that the unit will be heavier when it is fully loaded. C lean the surface where the stacking kit is going to be installed. P lace the mounting bracket on the Washer as indicated.
2.
2) R emove the 2 plastic covers (shown in figure 6) attached to the middle of the stacking kit, and save these for later use. R emove the double back tape and firmly attach the stacking kit the top of the washer to assure the proper seal. Make sure the word F R ONT printed on the stacking kit is facing forward as shown above.
( back )
3.
4.
4) Install all 7 screws provided with a power drill and tighten the stacking kit to the unit base securely.
3) P ut back edge of stacking kit to back mold line of washer¡¯s top cover a nd tighte n the screw.
6) G ently push the dryer into position as indicated in figure 5 & 6, sliding the unit into the slots provided. It is important that the dryer is level. Make sure all four leveling legs are pushed all the way back into the slots to ensure proper mounting.
5.
5) Y our Dryer is equipped with 4 leveling legs. Make sure they are lowered 10 mm, so there is a gap between the legs and the dryer base.
6. 7.
7) Insert the plastic covers (removed in section 2) covering the two front slots of the leveling legs. Depending upon the location of the unit, it may be necessary to change the side on which the dryer door opens.
8.
DC 68-01052A
|
|
|
> |
|