|
|
|
Categories
|
|
Information
|
|
Featured Product
|
|
|
 |
|
|
There are currently no product reviews.
 ;
Great price for the manual and easy to locate on the site and download. I would buy again.
 ;
Very good copy of Manual, clear and easy to print off, arrived very promptly and reasonably priced. Thanks, I will use you again
;
The service manual when downloaded and printed out was clear and easy to read. The manual is complete with the schematic diagram and technical data. I occasionally require a manual and now having registered with this company I shall order from them in the future.
;
Great manual, great price. I am very pleased with Owner-Manuals.com, quick service, fast communication. Will definitely use this site again.
;
Hello from Germany - thank you very much for the manual for my Sharp "Searcher" - the handling of your internet area is outstanding..Mike
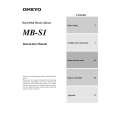
Recording
Dubbing all tracks on a CD (CD dubbing) Dubbing a track on a CD
1. Set the CD on the CD tray.
For setting the CD, see page 20.
1. Set the CD on the CD tray.
For setting the CD, see page 20.
2. Stop the CD or HDD.
STOP
2. Activate the CD player.
OPERATION
Press the
STOP button.
CD
Press the CD button.
HDD
3. Select a recording mode.
(See step 3 on the previous page.)
3. Select a recording mode.
(See step 3 on the previous page.)
REC MODE
REC MODE
Press the REC MODE button to select the desired recording mode. The recording mode switches to the next one with each press of the button.
Press the REC MODE button to select the desired recording mode. The recording mode switches to the next one with each press of the button.
4. Select a track you want to record.
Press the or track you want to record. button to select a
4. Start the CD dubbing.
CD DUBBING
Press the CD DUBBING button to start the CD dubbing. The group to which the recorded tracks will be added is automatically created to the HDD.
5. Put the MB-S1 into the recording standby state.
HDD REC
Tip: If you want to stop the CD synchronous recording or the CD dubbing during operation, press the STOP button.
Press the HDD REC button. The MB-S1 enters the CD synchronous recording standby state. The display area will change to .
6. Select a target group for recording.
HDD REC
Press the HDD REC button again to select a target group for recording. You can select Current or New for the target group. Current: The new recording will be added to the end of the existing group containing recorded tracks. New: The new recording will be recorded as the first track for a new group.
7. Start dubbing a track on a CD.
CD DUBBING
Pressing the CD DUBBING button locates the beginning of the selected track and starts recording automatically.
23
 $4.99 MB-S1 ONKYO
Service Manual Complete service manual in digital format (PDF File). Service manuals usually contains circuit diagr…
|
|
|
> |
|