|
|
|
Categories
|
|
Information
|
|
Featured Product
|
|
|
 |
|
|
There are currently no product reviews.
 ;
It's a grate service manuals.Have many details and the writing it's so clear.You have all you want in manual,nothing missing,belive me.I'm verry satisfied of this manual.
;
Great scanned service manual
Usefull informations.
I will buy again!
Best Regards
;
The manual describes this product very good. It has the basic things to know and also a more detailed look. Very well made!
;
An excellent document to assist in the repair of my old personal tape player. It includes full circuit diagrams and physical layout drawings and full instructions on disassembly and fault finding.
Well worth the meagre price.
;
Very good conversation, Pretty fast Service, wood do it again,
Have paid by Paypal, so i got the Service Manual online after 15 Min.
Very helpfully.
Greeting from Germany,
Hans
HOSE REPLACEMENT
Removal
1. Remove the dust cover and dust bag. 2. Remove the end of the hose from the wand. Remove the hose by removing the two screws which secure it to the dust container.
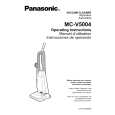
EXPLODED VIEW (NOZZLE HOUSING)�
A BLOCK
A-14 A-3
Replacement
1. Install the new hose by replacing the two screws which secure it to the dust container.
A-1
A-6 A-15
A-7
2. Replace the hose onto the wand. 3. Replace the dust bag and dust cover.
A-2
MOTOR PROTECTOR REPLACEMENT
Removal
1. Remove the dust cover and dust bag. 2. Remove the motor protector (shown in the exploded view in the C Block section), by pushing in, one at a time, on the tabs that secure it to the dust compartment. Push the motor protector out the back of the dust compartment. 3. Once the motor protector is out it can be disassembled for parts replacement.
A-5
Disassembly
1. Holding a pair of needle nose pliers at an angle and in a position where one side of the pliers is against the locking tab, exert enough pressure on the tab to release it (Fig. 11). NOTE: There are two locking tabs present, but only one needs to be released. For reassembly look at the exploded view in the C Block.
A-4
B BLOCK
Installation
(Fig. 11)
1. Reinstall the motor protector into the dust compartment by aligning the two tabs under the top flange with the slots in the dust compartment and applying pressure until it snaps into place.
A-8
A-10 A-11 A-12
A-9
A-13
- 16 -
-5-
|
|
|
> |
|