|
|
|
Categories
|
|
Information
|
|
Featured Product
|
|
|
 |
|
|
There are currently no product reviews.
 ;
Very detailed product, also it is a scanning from original, very useful if you have to service this type of amplifier ! Very good product, very hard to find!
;
the Manual was made available as promised, the scans were excellent..Good Work !!!
;
It's complete and helpful manual with good quality of scan. Thanks very much.
;
The service was quick and simple, finding the service manual easy and it appears to be the original with colour schematics. It contained the info I was after and so sorted the problem.
I have copied it to CD and attached the envelope to the inside back cover of the owners manual. Good manual and excelent service. Robin Wood, Wood Electronics, New Zealand.
;
Exactly what was needed to assess the product - excellent value and great service
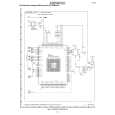
2. SERVICE MODE
Service Mode 1. While Mains cord is disconnected, press DISPLAY Button on the unit and plug in the Mains cord. 2. Version number of the front micom software is displayed. 3. Turn JOG dial to either direction then Display segment test begins. 4. First all the segments will light and then a segment turns off one by one. 5. Disconnect Mains cord to quit service mode.
Emargency Eject
1. Remove 5 screws on the top cover and remove the top cover. 2. Remove 4 screws on the bottom. (Pointed with the arrows in the picture above.)
3. Disconnect the flexible wire. 4. Remove the MD mechanism component from the unit and remove the 4 screws on the both sides. (Pointed with the arrows in the picture above.)
5. Slide the lever pointed with the arrow to the direction of the arrow.
6. Slide the pin pointed with the arrow to the direction of the arrow.
7. Disc is ejected.
2
|
|
|
> |
|