|
|
|
Categories
|
|
Information
|
|
Featured Product
|
|
|
 |
|
|
There are currently no product reviews.
 ;
Everything is OK. Owner's Manual I downloaded ( I get link for it by email).
;
The only reason I gave this less than 4 stars, is because it shouldn't take 24 hrs to have the download available. I was surprised to find that I had to wait until the next day to be able to download the manual that I paid for.
The manual itself is the correct manual.
 ;
Excellent replacement for original Owner´s Manual. I am totally satisfied!
;
Great service. Manual is as advertised and delivered when promised.
;
Perfect quality, highly appreciated service !!!
Fast delivery of the download info, no issues at all. Recommended E-manual shop !!!
(Continued)
ENTER
DELETE/CLEAR TIMER
REC LEVEL
MIN
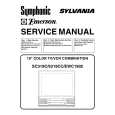
s Timer recording
Before timer recording, the following preparations are required. q Load a recordable MD.
MAX
1 While in the stop mode, press the TIMER button, and then
turn the jog dial until "TIMER SET" appears.
2 Within 10 seconds, press the ENTER button, and then select
"TIMER REC" using the jog dial.
1 2 3
AM
3 Press the ENTER button.
q The start time setting display will appear.
4 Enter the �hour�, using the jog dial. Then, press the ENTER
button.
5 Enter the �minute�, using the jog dial. Then, press the ENTER
button. q The stop time setting display will appear.
6 Enter the �hour�, using the jog dial. Then, press the ENTER
button.
4
AM
7 Enter the �minute�, using the jog dial. Then, press the ENTER
button. q The start and stop times are now set.
AM
8 Select the source program using the jog dial.
5
AM
ANALOG � DIGITAL OPT � DIGITAL COAX q If you select the analog input, adjust the recording level. (Page 22)
AM
9 Press the ENTER button.
Setting timer for recording:
q The stop time setting display will appear. q The �hours� display will be automatically increased one hour.
1 Press the TIMER button, and then select "T-STANDBY" using
6
AM
the jog dial.
AM
2 Press the ENTER button.
q The settings will appear in order, and the unit will enter the timer recording stand-by mode. (The power will be turned off.)
7
AM
Preparations for any equipment connected to this unit Any equipment, such as a stereo, that is connected to this unit should be set up in advance as follows: q Set it up so that music to be recorded will be played at the same time as the timer�s start time. When the digital optical input was selected
8
1
(Timer stand-by mode)
2
TIMER REC
Timer recording indicator
37
|
|
|
> |
|