|
|
|
Categories
|
|
Information
|
|
Featured Product
|
|
|
 |
|
|
There are currently no product reviews.
 ;
It was a great experience,instead of purchasing a new Stereo Amplifier ,in just minutes i repaired my old one and that was thaks to the manual I have purchased from you.
Thanks again.
Samuel Alter
;
Das ging ja sehr unkompliziert hat bestens geklappt und die Quallität ist auch noch gut.
Vielen Dank dafür.
;
Everything okay, thanks a lot. It was a pleasure for me to make a deal with you.
;
A deal without problems, very fast and the manual is a good quality. Sorry for the my english.
;
Superb service and excellent quality of the document received
5-8. FOCUS BIAS ADJUSTMENT
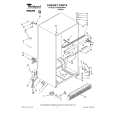
Adjusting Method: 1. Load a continuously recorded disc (Refer to �5-4. Creating MO Continuously Recorded Disc�.). 2. Press the = 0 button or ) + button and display �CPLAY MODE�. 3. Press the YES button and display �CPLAY MID�. 4. Press the EDIT/NO button when �C1= AD= � is displayed. 5. Press the = 0 button or ) + button and display �FBIAS ADJUST�. 6. Press the YES button and display � / a= �. The first four digits indicate the C1 error rate, the two digits after [/] indicate ADER, and the 2 digits after [a=] indicate the focus bias value. 7. Press the ) + button and find the focus bias value at which the C1 error rate becomes 220. (Refer to note 2.) 8. Press the YES button and display � / b= �. 9. Press the = 0 button and find the focus bias value at which the C1 error rate becomes 220. (Refer to note 2.) 10. Press the YES button and display � / c= �. 11. Check that the C1 error rate is below 50 and ADER is 00. Then press the YES button. 12. If the �( )� in � - - ( )� is above 20, press the YES button. If below 20, press the EDIT/NO button and repeat the adjustment from step 2 again. 13. Press the EDIT/NO button and press the 6 button to remove the continuously recorded disc. Note 1: The relation between the C1 error and focus bias is as shown in the following figure. Find points a and b in the following figure using the above adjustment. The focal point position c is automatically calculated from points a and b. Note 2: As the C1 error rate changes, perform the adjustment using the average vale.
C1 error 220
5-9. ERROR RATE CHECK
5-9-1. CD Error Rate Check Checking Method: 1. Load a test disc TDYS-1. 2. Press the = 0 button or ) + button and display �CPLAY MODE�. 3. Press the YES button and display �CPLAY MID�. 4. �C1= AD= � is displayed. 5. Check that the C1 error is below 20. 6. Press the EDIT/NO button, stop playback, press the 6 button, and remove the test disc. 5-9-2. MO Error Rate Check Checking Method: 1. Load a continuously recorded disc (Refer to �5-4. Creating MO Continuously Recorded Disc�.). 2. Press the = 0 button or ) + button and display �CPLAY MODE�. 3. Press the YES button and display �CPLAY MID�. 4. �C1= AD= � is displayed. 5. If the C1 error is below 50, check that ADER is 00. 6. Press the EDIT/NO button, stop playback, press the 6 button, and remove the continuously recorded disc.
5-10. FOCUS BIAS CHECK
Change the focus bias and check the focus tolerance amount. Checking Method: 1. Load a continuously recorded disc (Refer to �5-4. Creating MO Continuously Recorded Disc�.). 2. Press the = 0 button or ) + button and display �CPLAY MODE�. 3. Press the YES button and display �CPLAY MID�. 4. Press the EDIT/NO button when �C1= AD= � is displayed. 5. Press the = 0 button or ) + button and display �FBIAS CHECK�. 6. Press the YES button and display � / c= �. The first four digits indicate the C1 error rate, the two digits
b
c
a
after [/] indicate ADER, and the 2 digits after [c=] indicate the focus bias value. Check that the C1 error is below 50 and ADER is 00. 7. Press the YES button and display � / b= �. Check that the C1 error is not below 220 and ADER is not above 00 every time. Focus bias value 8. Press the YES button and display � / a= �. (F. BIAS) Check that the C1 error is not below 220 and ADER is not above 00 every time. 9. Press the EDIT/NO button, next press the 6 button, and remove the continuously recorded disc. Note 1: If the C1 error and ADER are above 00 at points a or b, the focus bias adjustment may not have been carried out properly. Adjust perform the beginning again.
� 16 �
|
|
|
> |
|