|
|
|
Categories
|
|
Information
|
|
Featured Product
|
|
|
 |
|
|
There are currently no product reviews.
 ;
Please tell us what you think and share your opinions with others. Be sure to focus your comments on the product. You will receive $2.00 of store credit for Your review.
;
Please tell us what you think and share your opinions with others. Be sure to focus your comments on the product. You will receive $2.00 of store credit for Your review.
;
Good copy and great customer service! There was some confusion with my order and it was resolved promptly!
;
Having bought a pre-owned Sony FM stereo tuner through eBay, it came without any manuals. It soon became clear that to get the best from this excellent tuner I needed a decent manual because much of the operation was not intuitive to a newboy to hi fi like me. I managed to download the official Sony multi-lingual manual from Owner-Manuals.com with no problem at all - a really quick and easy service. I'm very glad I did because I found out all the operations of the tuner and was then able to not only set it up quickly but also to get much more from it that poke-and-hope trialling would ever achieve. In my book $4.99 very well spent.
;
This manual is immaculate in it's accuracy. Everything is written very clearly and easy to understand. Written by a professional who wants to convey a clear and easy to understand message!!
Entretien
Tiroir de remisage
ATTENTION
Ne pas remiser dans le tiroir de remisage des articles en plastique ou papier, ou des produits alimentaires ou matériaux inflammables. Les températures à l�intérieur du tiroir peuvent devenir trop élevées pour ces articles lorsque le four est en cours d�utilisation. Le tiroir de remisage peut être enlevé pour pouvoir nettoyer sous la cuisinière.
Prise de courant auxiliaire
(modèles canadiens seulement)
La prise de courant auxiliaire est située en bas/à gauche du dosseret. Veiller à ce que le cordon d�alimentation de l�appareil utilisé ne repose pas sur un élément de la table de cuisson ou à proximité; la mise en marche de l�élément chauffant ferait subir des dommages au cordon d�alimentation et à la prise de courant. Un appareil suscitant une demande de courant de plus de 10 A provoquera l�ouverture du disjoncteur qui protège la prise de courant auxiliaire. Pour réarmer le disjoncteur, appuyer sur le commutateur situé sur le bord inférieur du dosseret.
DISJONCTEUR
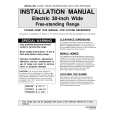
Dépose :
1. Vider le tiroir et le tirer jusqu�à la position de la première butée. 2. Soulever l�avant du tiroir. 3. Tirer le tiroir jusqu�à la position de la deuxième butée. 4. Saisir les côtés et soulever le tiroir pour pouvoir le retirer.
Réinstallation :
1. Positionner les extrémités des glissières dans les rails à l�intérieur de la cuisinière. 2. Soulever l�avant du tiroir et pousser doucement jusqu�à la position de la première butée. 3. Soulever à nouveau le tiroir et le pousser en place pour le fermer.
44
|
|
|
> |
|