|
|
|
Categories
|
|
Information
|
|
Featured Product
|
|
|
 |
|
|
There are currently no product reviews.
 ;
This GRUNDIG UV5A Owner Manual is not only an instruction manual but a total functional circuit description of the Multimeter and includes circuit diagram at the end pages. It is very helpful for repairing and calibrating the instrument. It is written in two languages English and German for international support. It was very easy to repair my unit with this document. Regards, Regis Pauly, Electrical Engineer.
;
The owner's manual was evetything I thought it would be. I was able to print it out using both sides of the paper in quick order, saving me a search online for a used one.
 ;
Хорошее качество сканирования.
Мануал пришел часов эдак через 12. В целом доволен.
;
Fantastic quality and impressive delivery time. Based on this manual, I recommend this service without hesitation! Five Stars for certain.
;
Was happy to find the complete owners manual... It's all in there, just like the original...
�
!:�
;
%
�f
,
js
¸
�
�
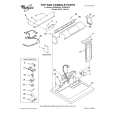
Oven Light
,_
� � CAUTIONS: Disconnect power to range before replacing light bulb. Use a dry potholder to prevent possible harm to hands when replacing bulb. Be sure bulb is cool before touching bulb. Do not touch hot bulb with a damp cloth as this may cause the bulb to break. edge of the oven bottom clears the oven front frame. Remove oven bottom from oven. To replace: Fit the fiont edge of the oven bottom into the oven front frame. Lower the rear of the oven bottom and slide the two catches back to lock the oven bottom in place.
� �
Storage Drawer
_lk �
CAUTION:
To replace oven light bulb: 1. When oven is cool, hold bulb cover in place, then slide wire retainer off _
Do not store plastic, paper products, food or flammable materials in this drawer. The drawer may become too warm for these items when the oven is in use.
BULeCOVER l The storage drawer can be removed to allow you to clean
coverorE-Bulb coverwillfa,l,fnot///A( s
WRE RETAINER 2. Remove bulb cover and light bulb. 3. Replace with a 40 watt appliance bulb. 4. Replace bulb cover and secure with wire retainer. 5. Reconnect power to range. Reset clock. heldinplace while // removing wire re- _ tainer. ,_/ __z..__.
/
under range the
To remove: 1. Empty drawer and pull out to the first stop position. 2. Lift up the front of the drawer. 3. Pull out to the second stop position. 4. Grasp sides and lift drawer up and out. To replace: 1, Fit the ends of the drawer glides into the rails in the range. 2. Liftupfrontofdrawerandgendypushintothefirststop position. 3. Lift drawer up again and push until drawer is closed.
Oven Bottom
The oven bottom on a conventional bake range may be removed for easier cleaning. NOTE: The oven bottom on convection models is not removable. To remove: When cool, remove the oven racks. Slide the two catches, located at each rear corner of the oven bottom, toward the front of the oven. Lift the rear edge of the oven bottom slightly, then slide it back until the front 2
22
|
|
|
> |
|