|
|
|
Categories
|
|
Information
|
|
Featured Product
|
|
|
 |
|
|
There are currently no product reviews.
 ;
manual was very helpful in learning how to propery use my washer. I could not find this manual anywhere else.
 ;
Awesome quality manual. You really saved my bacon with this one. Was looking for some specific information with regards to my "new" vintage VCR that didn't come with the owners manual. This site is truely a goldmine of available manuals. The quality of the scans are top notch.
Thank-you so much for this awesome manual. If you're looking for this Sony SL-HF400 owners manual, this is the one you NEED to buy. Definitely worth the money.
;
The manual was made available promptly. I is a clean scan of the original. I had no problem downloading it. The scan was well centered and cleanly formatted. It is as good a product as can be had without being the original document.
;
Received downlink in less then 8 hours, Item was in good copy condition, and told me how to program the clock timer. The price was very resonable, and the process was very automated and was GREAT to work with.
;
Fast service, document is OK. Thanks! Searched for it long time.
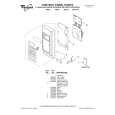
Replacing Filters
The grease filters should be removed and cleaned at least once a month. The charcoal filter cannot be washed and should be replaced every 6 to 12 months. Do not operate the microwave oven without the filters in place. See �Assistance or Service� to reorder filters. See �General Cleaning� for cleaning instructions.
Replacing Cooktop Light
The cooktop light is a candelabra base bulb. See �Assistance or Service� section to reorder.
To Replace:
1. Unplug microwave oven or disconnect power. 2. Remove the bulb cover mounting screw.
To Replace Grease Filters:
1. Grasp the tab and push the back of the filter up, then slide the filter back. 2. Pull the tab down until the filter drops out.
A
A. Mounting screw
3. Replace light. Close bulb cover. Replace mounting screw. 4. Plug in microwave oven or reconnect power. 3. With the tab side of the new or cleaned filter facing down, insert the end without the tab into the frame, then swing the end with the tab up and slide the filter into place.
Replacing Oven Light
The oven light is a candelabra base bulb. It will automatically come on when the door is opened and when the oven is operating. See �Assistance or Service� section to reorder.
To Replace Charcoal Filter:
1. Open the oven door. 2. Pull the vent grille forward and lift it out. 3. Push the filter back and clear of the rests, then lift the front of the filter up and slide it out.
To Replace:
1. Unplug oven or disconnect power. 2. Pull the vent grille forward and lift it out.
4. Slide the new filter back and into place so that it rests at an inclined angle (about 45°). 5. Align the bottom of the vent grille into position, then push the top back until it snaps into place.
3. Remove the charcoal filter (see �Replacing Filters� section). 4. Lift up the bulb cover.
A
A. Bulb cover
5. Replace the bulb. Close the bulb cover. 6. Replace the charcoal filter. 7. Align the bottom of the vent grille into position, then push the top back until it snaps into place. 8. Plug in oven or reconnect power.
17
|
|
|
> |
|