|
|
|
Categories
|
|
Information
|
|
Featured Product
|
|
|
 |
|
|
There are currently no product reviews.
 ;
Great manual, great price. I am very pleased with Owner-Manuals.com, quick service, fast communication. Will definitely use this site again.
;
Hello from Germany - thank you very much for the manual for my Sharp "Searcher" - the handling of your internet area is outstanding..Mike
;
I am very happy with the owner's manual. I bought a used Casio and was so relieved that I was able to get a hold of a owner's manual. It was very easy to download the manual and I had no problems with printing it. Thank you! Nancy Whalen
;
The purchased manual is an high-quality scan of the original JVC paper-based Owner´s Manual. I am very satisfied!
;
Very satisfied with received document, all is right, Thank You very much, it was a Pleasure to work with You.
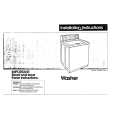
MICROWAVE OVEN CARE
General Cleaning
IMPORTANT: Before cleaning, make sure all controls are off and the microwave oven is cool. Always follow label instructions on cleaning products. Soap, water and a soft cloth or sponge are suggested first unless otherwise noted.
MICROWAVE OVEN DOOR AND EXTERIOR
The area where the microwave oven door and frame touch when closed should be kept clean.
â�
Mild, nonabrasive soaps and detergents: Rinse with clean water and dry with soft, lint-free cloth. Glass cleaner and paper towels or nonabrasive plastic scrubbing pad: Apply glass cleaner to towel, not directly to surface.
â�
GREASE FILTERS
Do not use ammonia or corrosive cleaning agents such as lyebased oven cleaners. â� Hot water and mild detergent: Soak filters, then scrub and swish to remove embedded dirt and grease. Rinse well and shake to dry.
â� â�
CONTROL PANEL
Sponge or soft cloth and water: Dampen sponge with water and wipe panel. Dry with soft cloth.
â�
Dishwasher: Wash separately, not with dirty dishes, because food can be trapped in the filters. NOTE: Some discoloration of the filters may occur after cleaning them in the dishwasher. This is normal, and will not affect the performance of the grease filters.
Do not use chemical or abrasive cleansers.
TURNTABLE
Replace turntable immediately after cleaning. Do not operate the microwave oven without the turntable in place. â� Mild cleanser and scouring pad
â�
MICROWAVE OVEN CAVITY
To avoid damage to the microwave oven cavity, do not use soapfilled scouring pads, abrasive cleaners, steel-wool pads, gritty washcloths or some recycled paper towels. The area where the microwave oven door and frame touch when closed should be kept clean. Average soil â� Mild, nonabrasive soaps and detergents: Rinse with clean water and dry with soft, lint-free cloth. Heavy soil Mild, nonabrasive soaps and detergents: â� Heat 1 cup (250 mL) of water for 2 to 5 minutes in microwave oven. Steam will soften soil. Rinse with clean water and dry with soft, lint-free cloth. Odors â� Lemon juice or vinegar: Heat 1 cup (250 mL) of water with 1 tbs (15 mL) of either lemon juice or vinegar for 2 to 5 minutes in microwave oven. Microwave Inlet Cover To avoid arcing and damage to the microwave oven, the microwave inlet cover (see â��Parts and Featuresâ��) should be kept clean.
â�
Dishwasher
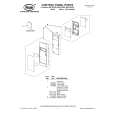
Replacing Filters
The grease filters should be removed and cleaned at least once a month. Do not operate the microwave oven or exhaust fan without the grease filters in place. The charcoal filters cannot be washed and should be replaced every 6 to 12 months. See �General Cleaning� for cleaning instructions. See �Assistance or Service� to reorder filters.
To Remove and Replace Grease Filters:
1. Remove each grease filter by sliding filter to the end. Pull tab down until the filter drops out.
A
A. Tabs
Wipe with wet cloth.
2. Replace grease filter by inserting one end of the filter into the outer end of the frame. Swing the other end up and slide into position.
12
|
|
|
> |
|