|
|
|
Categories
|
|
Information
|
|
Featured Product
|
|
|
 |
|
|
There are currently no product reviews.
 ;
Fast service, document is OK. Thanks! Searched for it long time.
 ;
I was very pleased with the manual I got for my amateur (ham) radio. Without it I could not figure out how to input and/or change the P/L setting on my radio. It drove me nuts as the radio was essentially useless. That all changed when my manual came. Then it took only minutes and I was done. Now my radio works fine. This is an exceptionally good resource as it's a very easy and user friendly download. Thank you very much! Dziękujemy za!
;
It answered my question, which was how to load the paper. I did notice that the very end of the manual was not visible.
;
The product manual I received was exactly what I was looking for, delivered painlessly at a very fair price. I can't ask for any more than that.
;
Very well done!!!!! congratulations. It was a bit longer than usual the wiating time even if it was on time (in 24 hours).
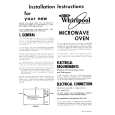
M-LEVEL
COOKING
RACK
Use the Bi-Level Cooking Rack when cooking in more than one container The rack can be turned upsrde-down to help fit taller containers on the bottom of the oven. See the MICRO MENUS� Cookbook provided with your oven
\
J
Second Position: Turn rack upside-down when using a taller container on the bottom of the oven.
First Position: Use the rack only when heatrng more than one contarner of food. Do not let a container touch the top of the oven.
._~~__ CLEANING
l
THE RACK
SPECIAL CAUTIONS
l
l
Wash by hand with a mrld detergent cr In vour drshwasher. Do not use abrasive scrubbers or cleansers.
Do not use with browning dish. Use only when cooking foods in more than one container. l Use only in the microwave oven. l Do not let food or containertouch the top of the oven. o Do not store rack in the oven. 0 Put food in containers, then place containers on rack. 0 Do not cook foods directly on rack without putting them in containers first.
l
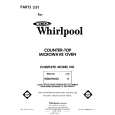
REPLACING
1.
Unplug 2. Remove holdtng access panel
THE LIGHT BULB
cord screw on
the power
3. Remove tne light bulb from its sot ket. 4. Replace bulb with a 40. watt appliance bulb. 5. Replace the access panel and holding screw. 6. Plug In the power cord
18
-Tmk
|
|
|
> |
|